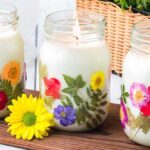
DIY Pressed Flower Candle Jars
Create dreamy DIY pressed flower candles with soy wax! Perfect for gifts or seasonal crafts—customize scents, colors & styles to make them your own.
Equipment
- Heat-Safe Bowl with Spout
- Heat-Safe Glass Jar or Cup 4 to 8-Ounce
- Parchment Paper 12-Inch Sheet
- Book Something Thick and Heavy
Ingredients
- 4 Ounces Mod Podge
- tweezers
- 3 Cups soy melting wax
- candlewick
- clothespin or index card
- essential oils or candle scent oil
- water
- fresh flowers
Instructions
- Arrange the flowers in a single layer between 2 sheets of parchment paper and place the parchment paper between the pages of the back of a heavy book. Let the flowers sit in the book for 1-2 weeks to as they dry and press.
- Brush the jar with Mod Podge where you want to place a flower and, using tweezers, place the flower over that spot and then brush a layer of Mod Podge over the flower. Repeat with more flowers until you are satisfied with the design.
- Let the Mod Podge dry for at least 1 hour. If your jar or cup wants to roll around, place a rolled-up kitchen towel inside the cup to weigh it down.
- Melt wax according to package instructions and once melted mix in the essential oils (use whatever combination and quantity you want to reach your desired fragrance). Some wax brands are ok to microwave, however, most are not safe to microwave. In most cases, place your heat safe bowl inside a water filled pot and place on your stove over medium heat. Stir continuously until the wax is melted and clear.
- Place the wick in the center of the jar and hold it in place with a clothespin. Pour the melted wax into the jar. Allow the candle to set on a flat surface for at least 8 hours (or overnight) until the wax has hardened. Most wax melts yellow but will become white again once cooled. Don’t be alarmed, the candle will not be yellow.
- Remove the clothespin and trim the wick so that it only sticks out of the wax by about ¼ inch.
- Light the candle and enjoy.
- Once the candle is fully burned, clean it out and put a tea candle or more melted wax in the flower jar.
Notes
Melt wax slowly and evenly: Use a double boiler or heat-safe bowl over simmering water to melt your wax slowly. Ultra hot wax can affect the candle’s quality so go slowly.
Add fragrance carefully: Essential or fragrance oils should be added just before pouring to preserve their scent. Stick to recommended oil-to-wax ratios for a balanced fragrance that’s not overpowering.
Keep the wick centered: Use a clothespin or wick holder to keep the wick in place. Centering it is essential for even burning, helping your candle last longer.
Avoid overfilling the jar: Leave space at the top of your candle jar to avoid spilling and allow for safe lighting.
Let the candle cure fully: Let the candle set and cool for at least 8 hours or overnight. This helps the wax and fragrance to set correctly, so the candle burns evenly and smells great.
Trim the wick regularly: Trim the wick to about ¼ inch before each burn to keep the flame steady, prevent soot, and extend the candle's lifespan.
QR code
Scan this QR code with your phone's camera to view this recipe on your mobile device.
