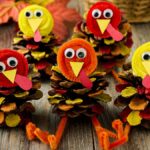
Pine Cone Turkeys
Make these fun pine cone turkeys with your kids for Thanksgiving decor. Each one is unique, colorful and full of personality.
Equipment
Ingredients
- pine cones medium size, about 3 x 3 inches
- matte acrylic craft paint in orange, yellow and red
- craft paper scraps in orange, yellow and red
- pipe cleaners in orange, yellow and red
- googly eyes 15mm or 0.6-inch
Instructions
- Start by painting some of the tips or scales of the pinecones, orange, yellow and red. These will be the turkey’s feathers. I like to leave some of them unpainted since brown goes so well with the other colors.
- To make the turkey’s legs, grab an orange or yellow pipe cleaner and bend it loosely in half, forming a U-shape.
- Fold each end down about 1 inch.
- Bend the end back up again so that the ends are even, forming a zigzag shape.
- Pinch the ends together, then fold up at a 90 degree angle and spread out the toes. The toes will be pointing up towards the ceiling and spread apart.
- Decide which side of the pinecone will be the front and then glue the legs to the bottom of each pinecone.
- To make the face, curl a pipe cleaner into a flat spiral and add a drop of hot glue to the end to secure.
- To make the faces more stable, I cut a circle shape out of the corresponding craft paper and glued it to the back of each pipe cleaner spiral.
- Cut small triangles out of yellow craft paper for the beaks and cut the wattles out of red craft paper. Each one will be different and that adds to their charm!
- Now, use your hot glue gun to glue on the googly eyes, yellow triangle and red wattle to the pipe cleaner spiral shape to make the turkey's face. Make sure to glue the wattle on first and then the beak.
- With your pinecone sitting upright, add hot glue to the pinecone where you would like the face and carefully glue it on.
Notes
Use dry pinecones: Make sure your pinecones are dry, other the glue won’t stick and they’ll be hard to paint.
Let paint dry: I painted the pine cones one color at a time, letting the paint dry, 15 to 20 minutes, before adding the next color, so as not to mix the colors.
Deeper colors: If you want the colors to be darker, you can add a second coat of paint.
Cut legs shorter: If they’re too long, trim before gluing.
Secure glue: Use enough glue so parts stay attached.
Make them unique: Different beak shapes and colors add personality.
QR code
Scan this QR code with your phone's camera to view this recipe on your mobile device.
