This post may contain affiliate links, please see the privacy policy for details.
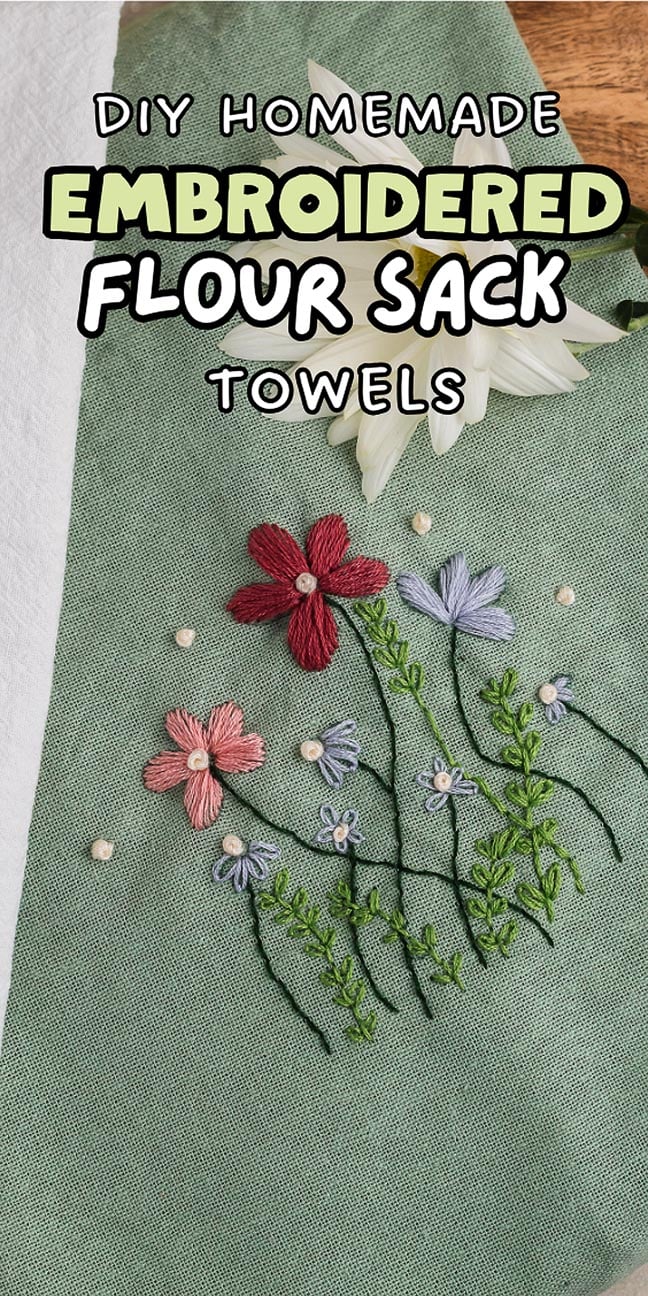
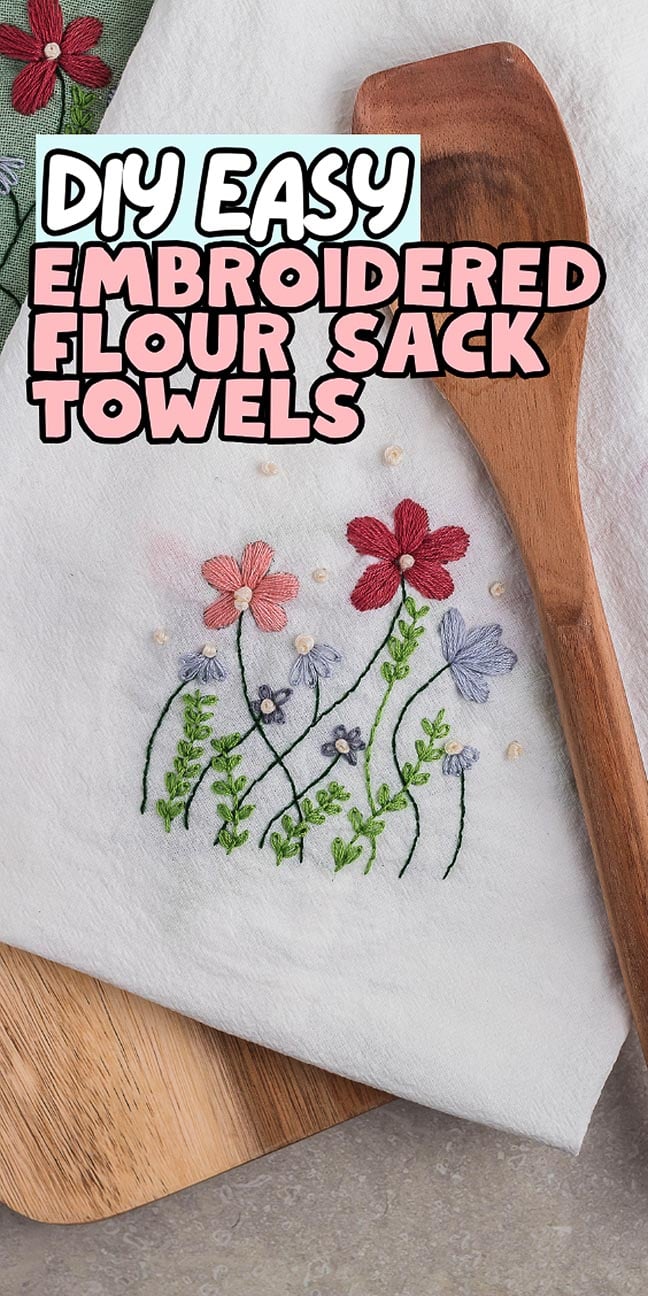
Flour sack towels are made from very thin cotton threads rather than sacks, despite the name! They’re heavier than cheesecloth and thinner than dish towels. Making your own DIY embroidered flour sack towels is an enjoyable craft project. The finished towels are not only beautiful but also very durable, resistant to shrinkage and look simple and clean. Make some for yourself and some to give as gifts.
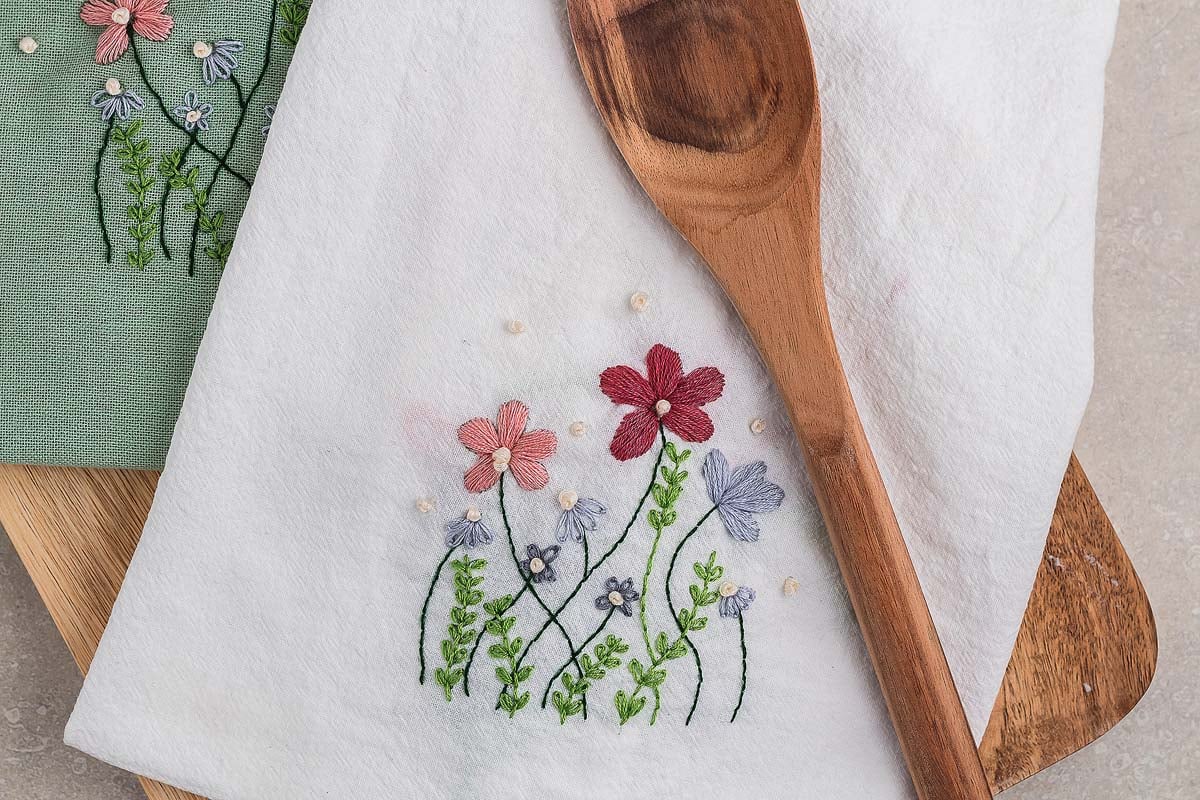
Learn how to create beautiful DIY embroidered flour sack towels for your kitchen or for gifts. This craft project is a lot of fun and you don’t need many materials.
Enjoy crafting? You might also like to make these cute personalized baskets, some soup mixes with printable labels or these DIY beeswax wraps.
Why You’ll Love It
Easy to do: You don’t have to be a needlework expert to do hand embroidery on flour sack towels. The instructions are relatively simple to follow.
An enjoyable project: Grab a drink and some snacks (maybe red velvet sugar cookies and strawberry lemonade) and get cozy. You’re going to have fun making your embroidery design towels!
Makes a great gift: These embroidered towels are a useful and pretty gift for anyone who has a kitchen (which is just about everyone!)
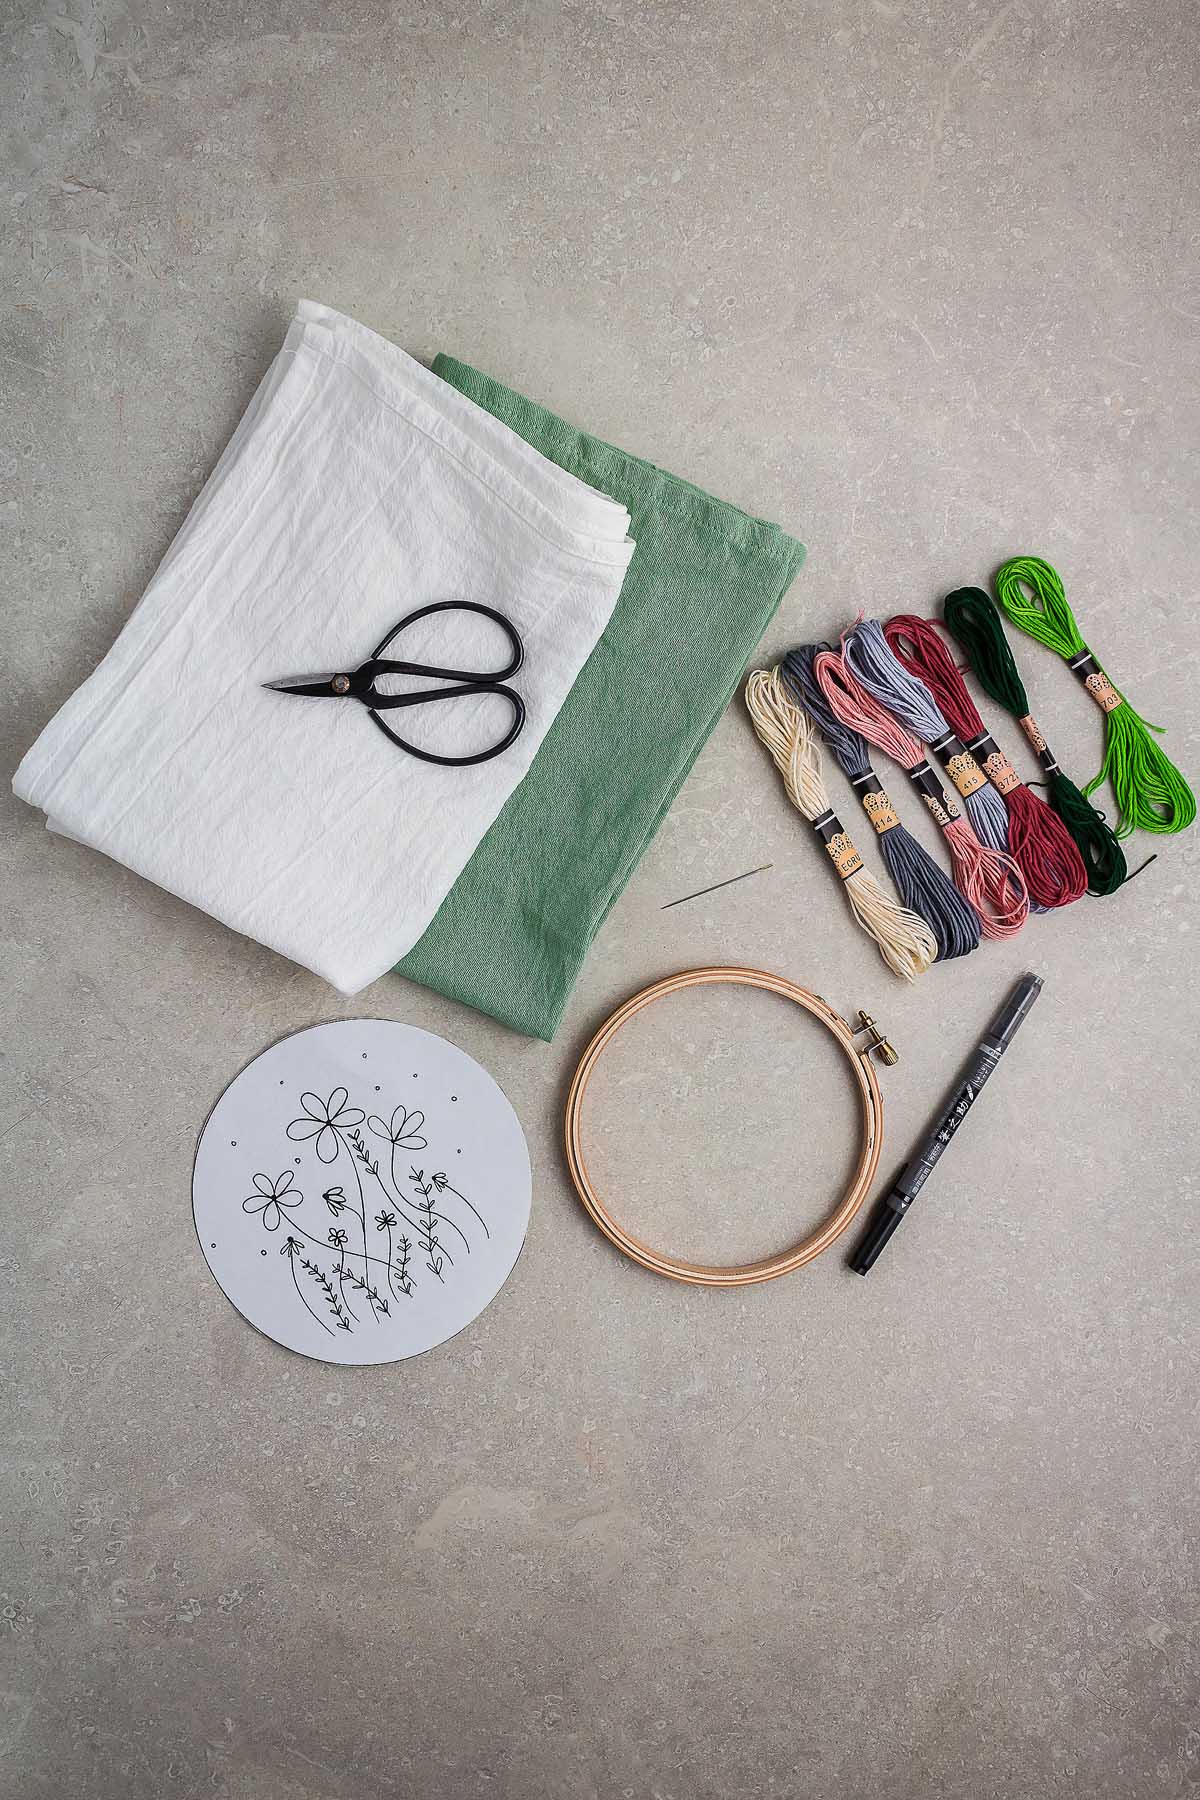
Embellished Flour Sack Towels Materials
A complete list of materials and amounts can be found in the tutorial card below.
Embroidery hoop: To hold your towel in place while you embroider it. (I used this 8-inch hoop).
Embroidery floss: Like thread but softer and pulls tighter. (Choose from hundreds of colors!)
Flour sack towels: Use any color or dye towels a custom color if you like.
Sewing needle: If you sew or embroider, you’ll already have lots of these!
Printer: To print the embroidery design.
Water-soluble marker: To trace the embroidery pattern.
How to Embroider Tea Towels
For more detailed instructions with measurements, jump to the printable tutorial card.
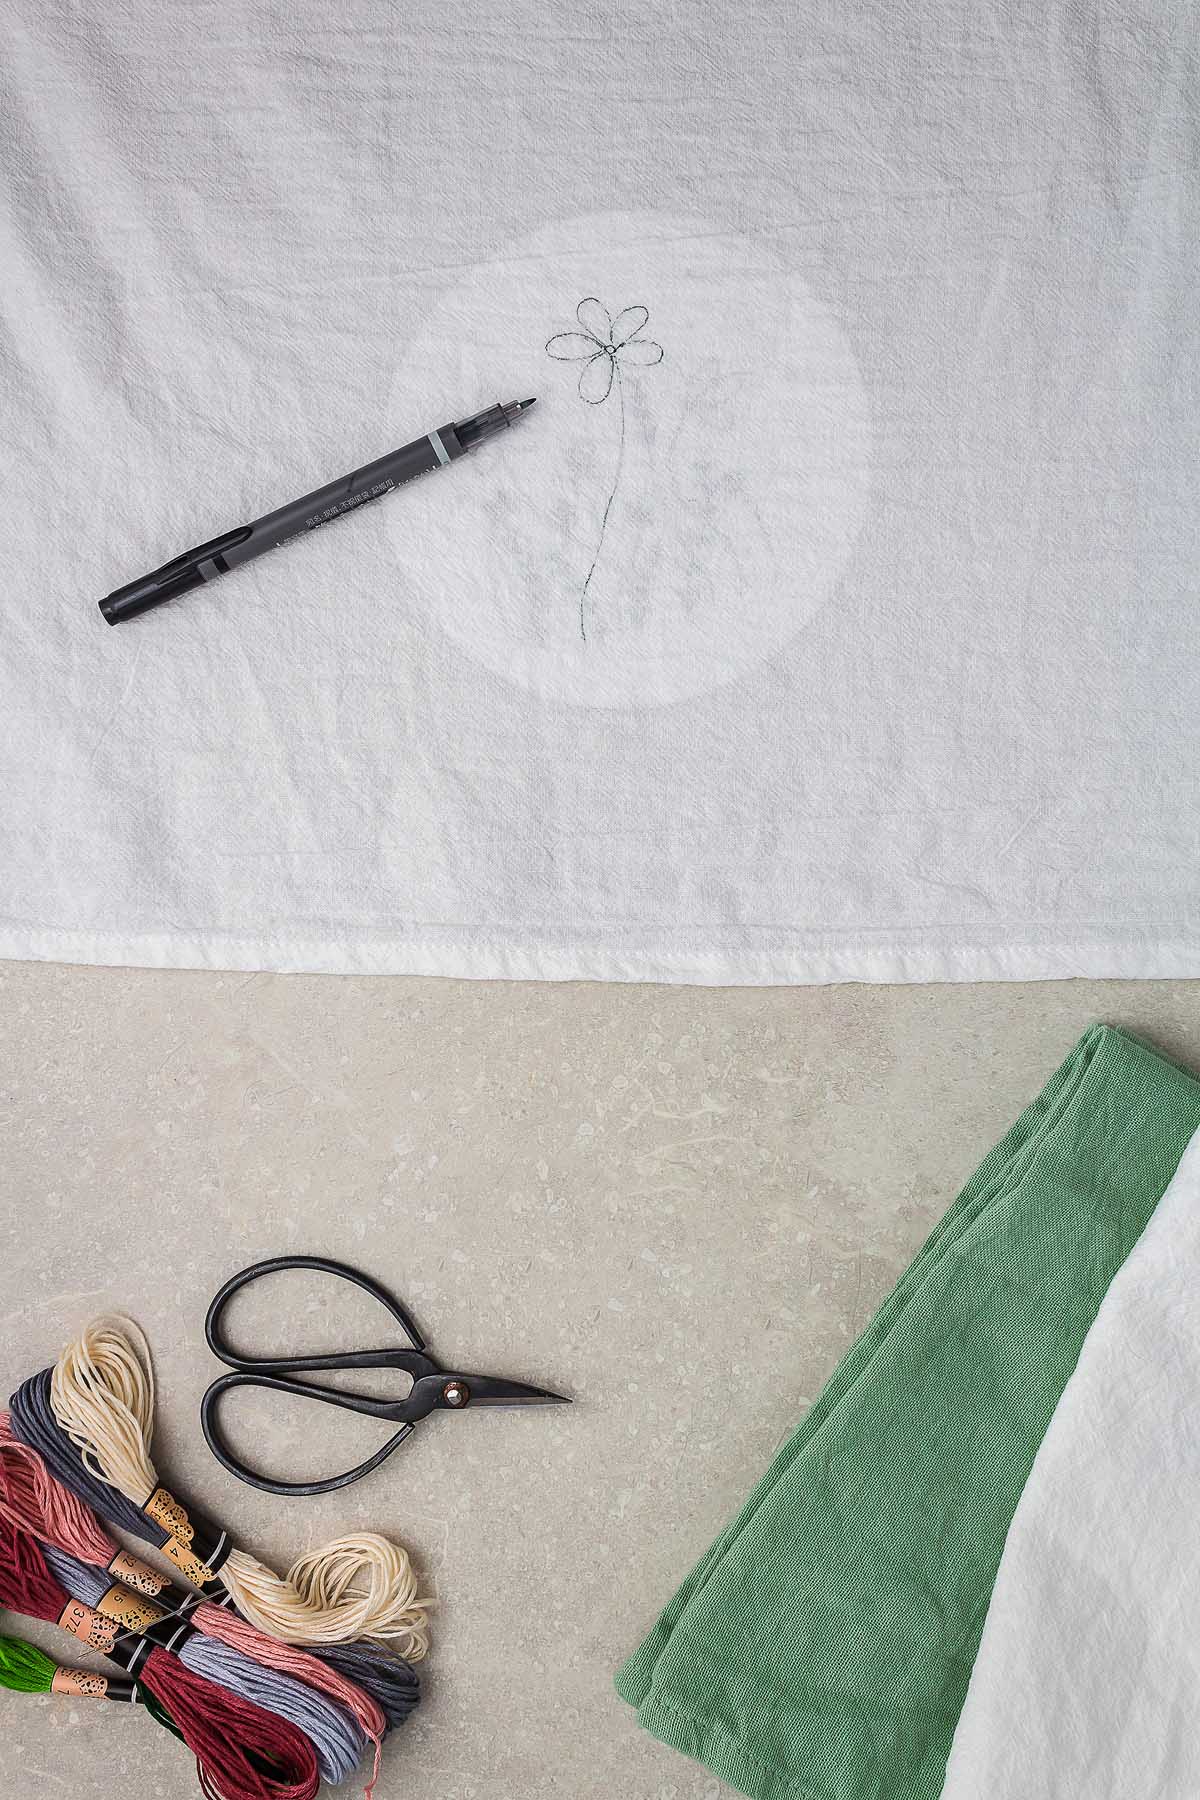
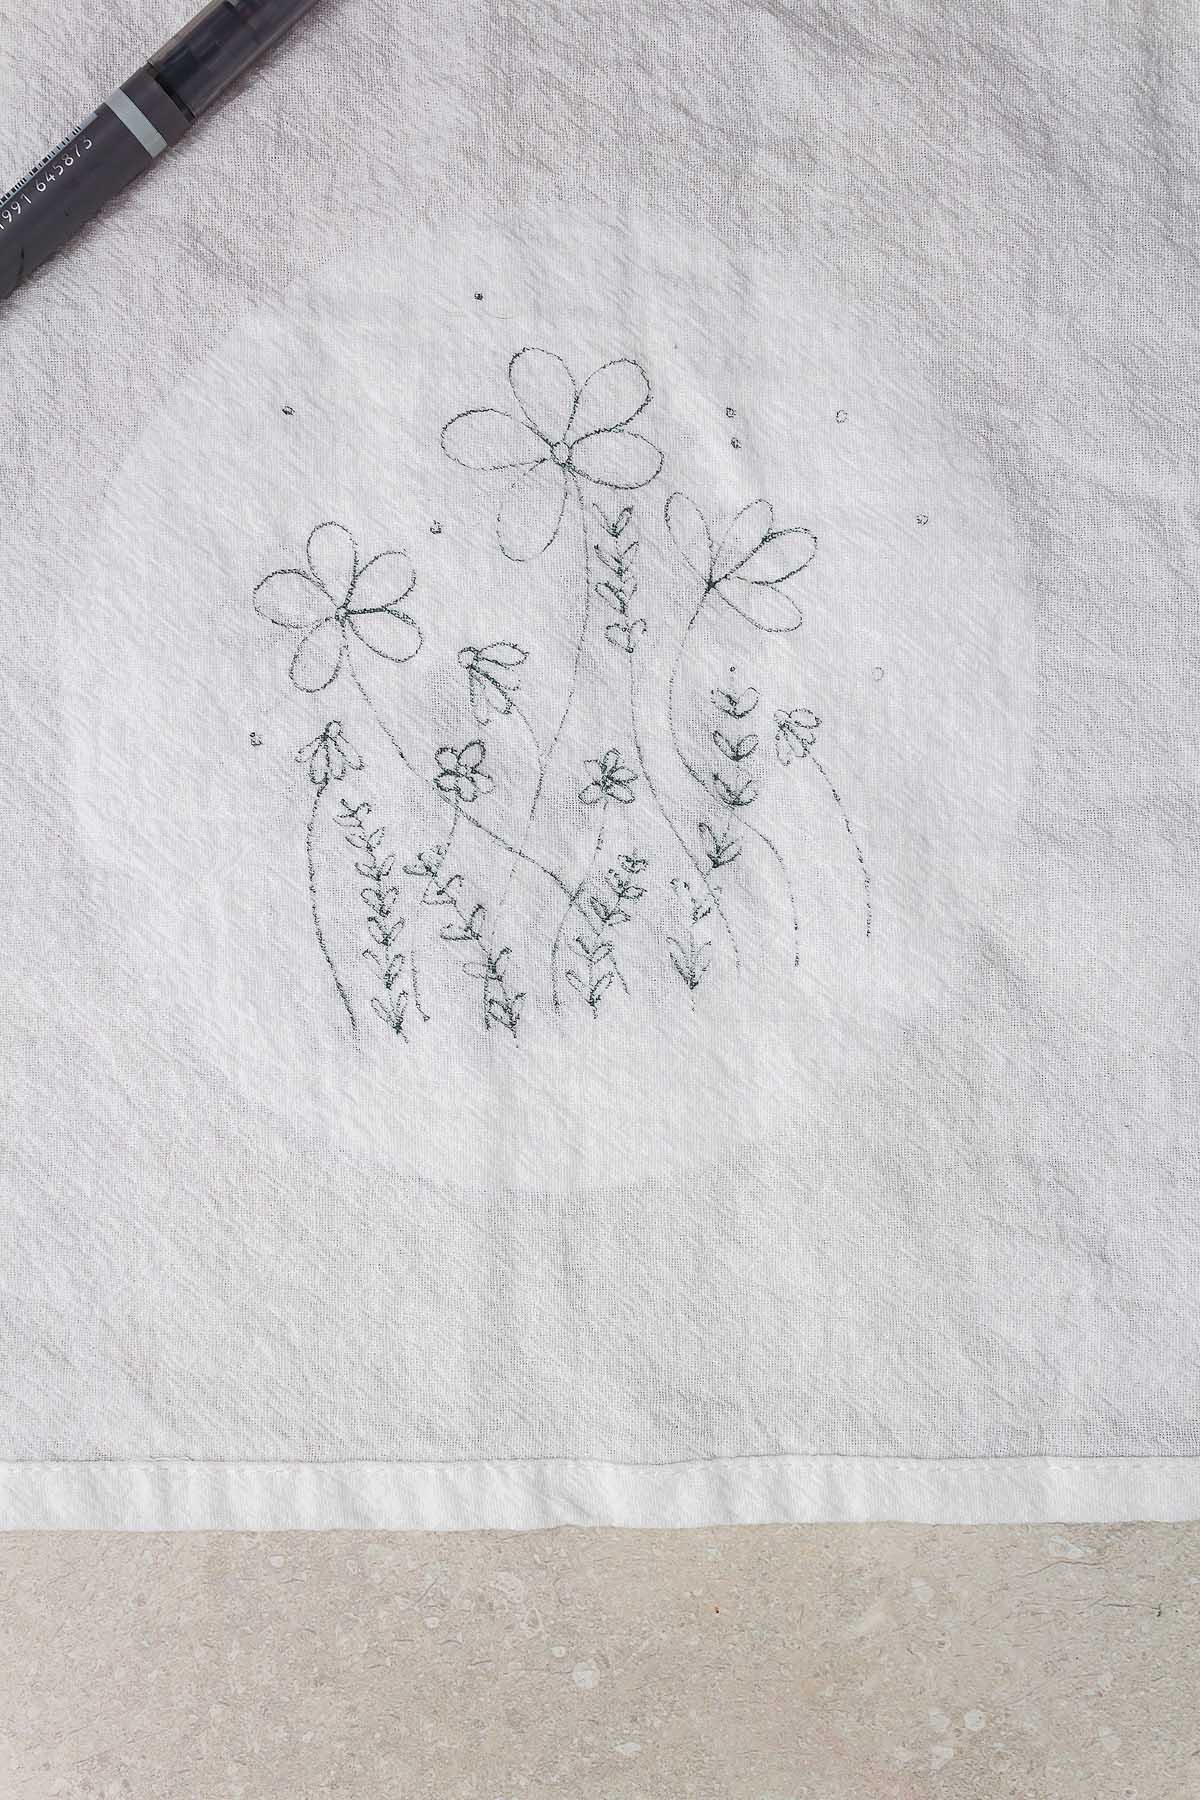
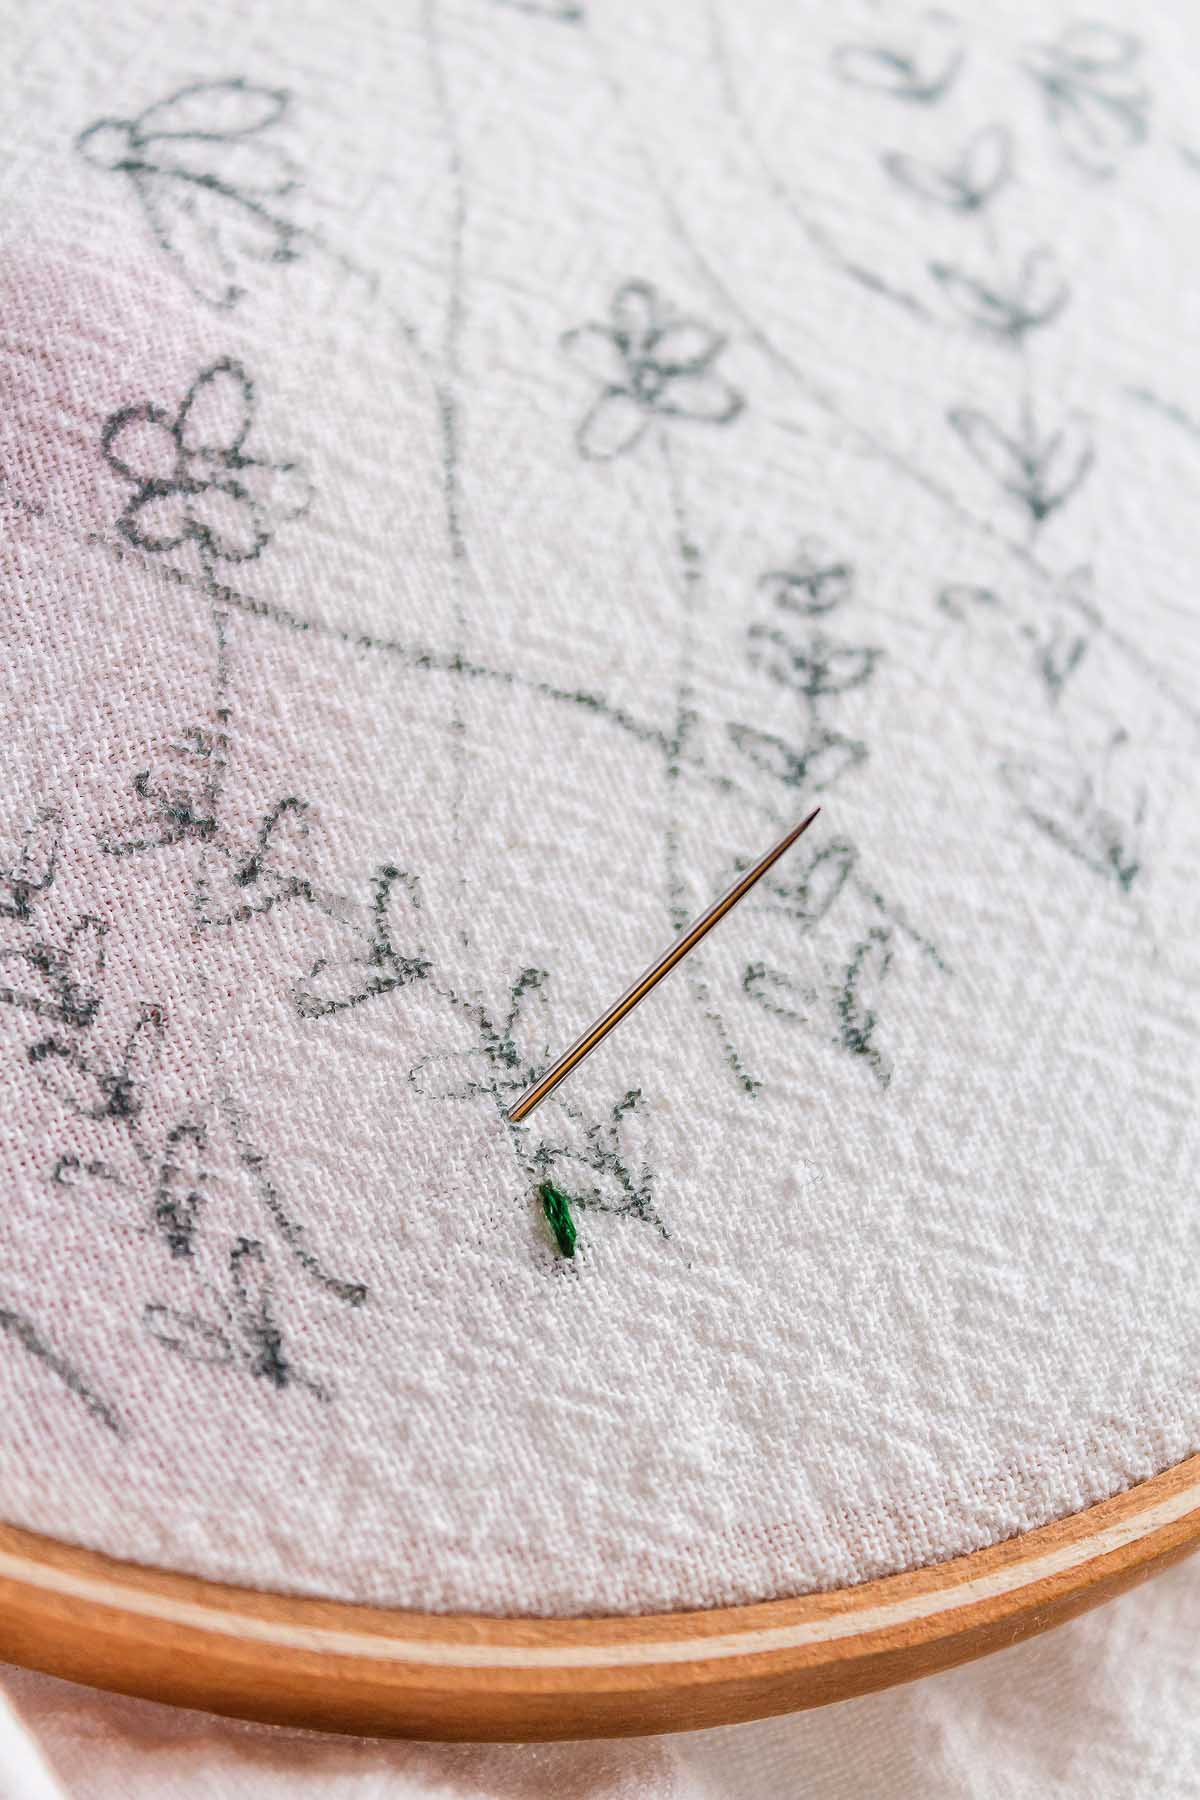
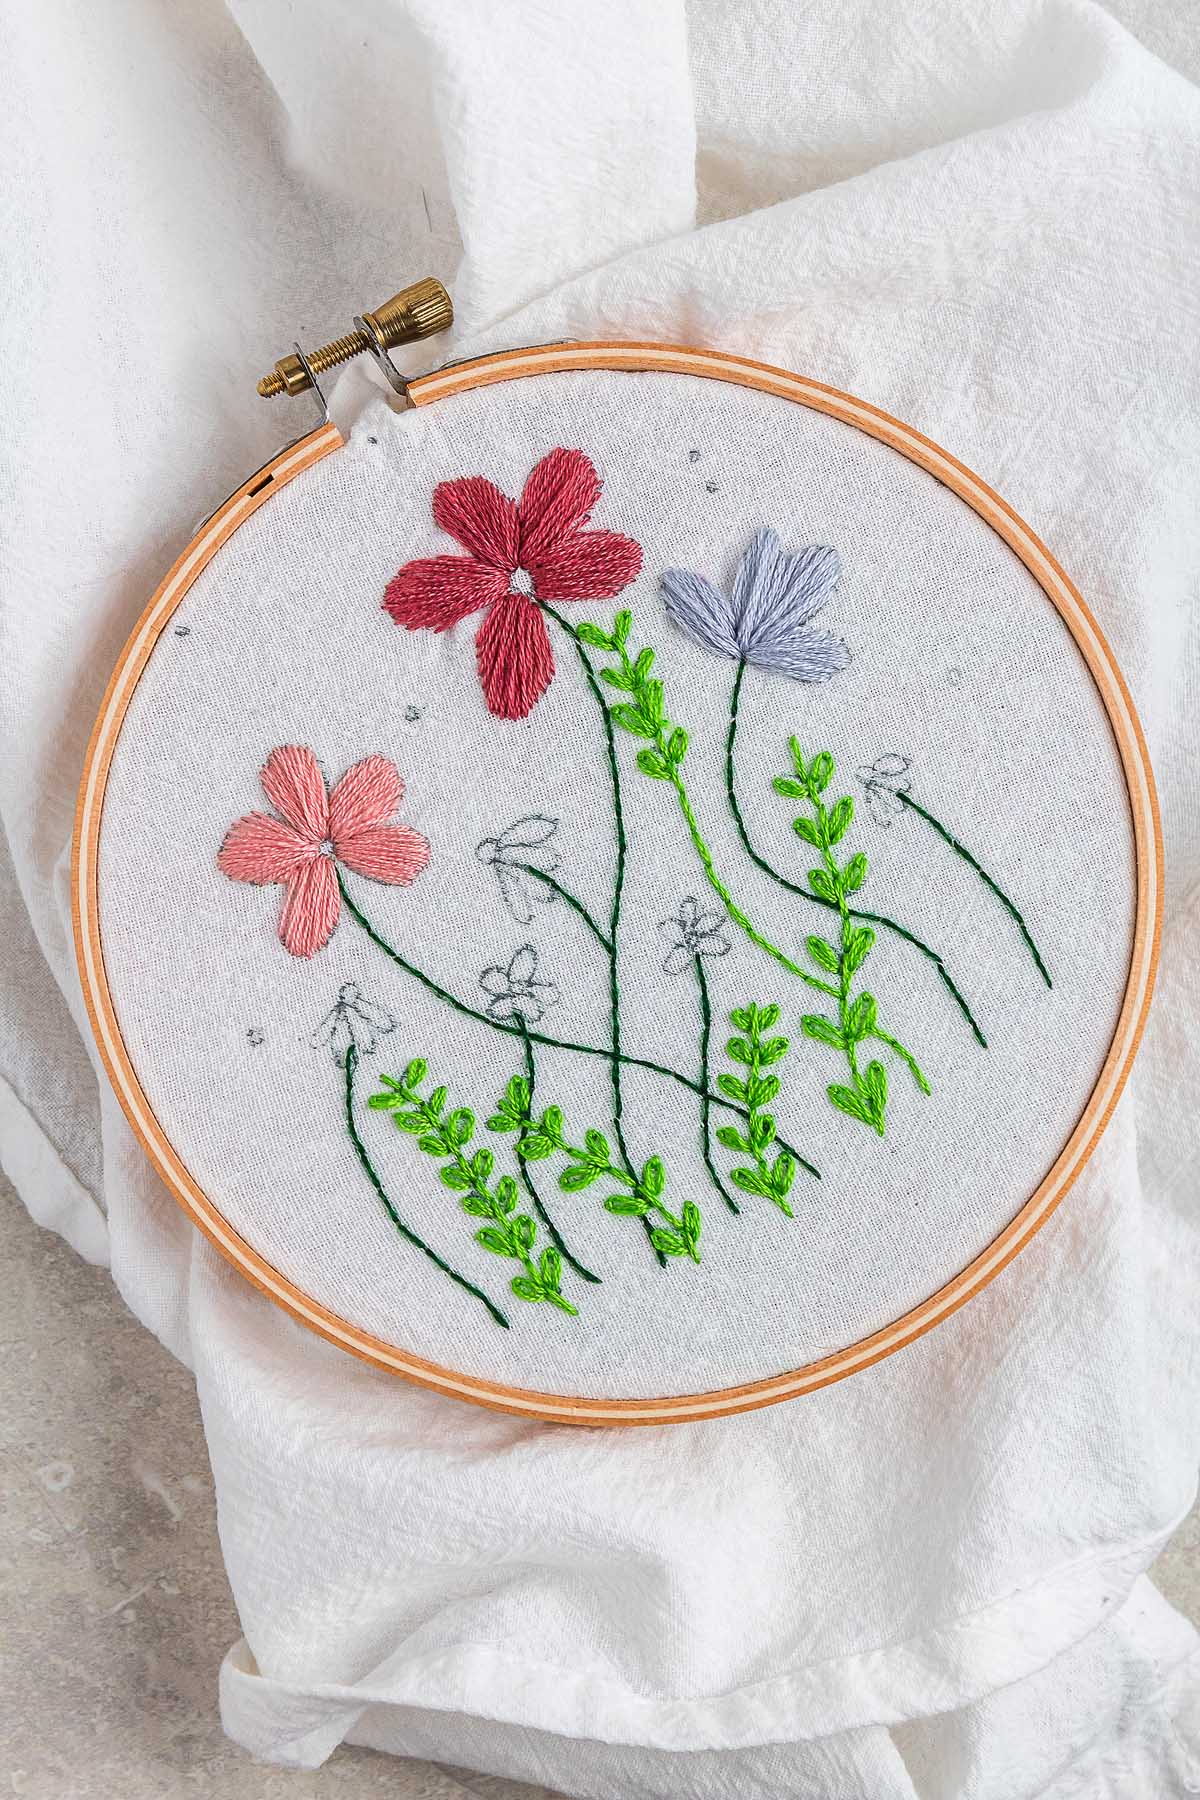
Apply the embroidery pattern to the flour sack towel: Print the embroidery design and put it on the underside of your towel. Trace it with a water-soluble marker or light pen. Center the design on the embroidery hoop and stretch the material taut. Screw the hoop closed.
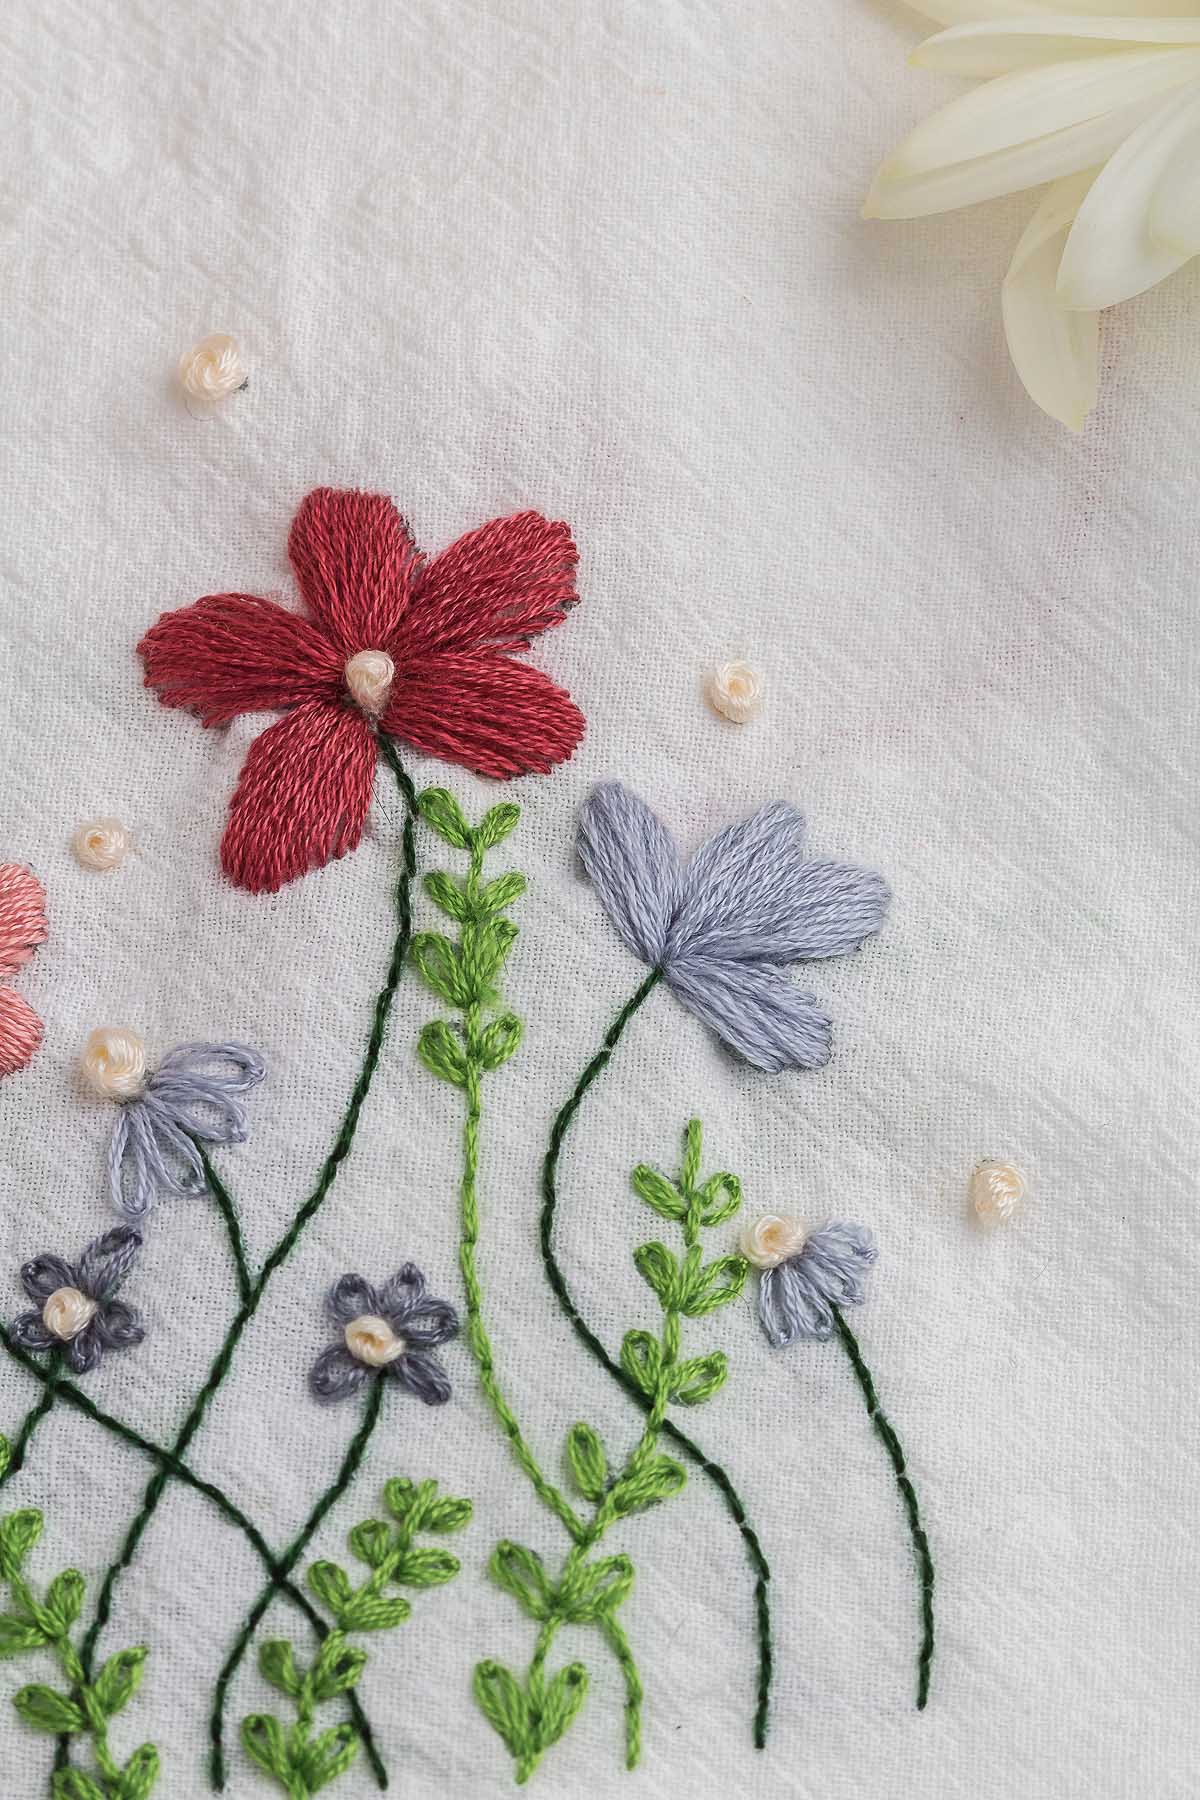
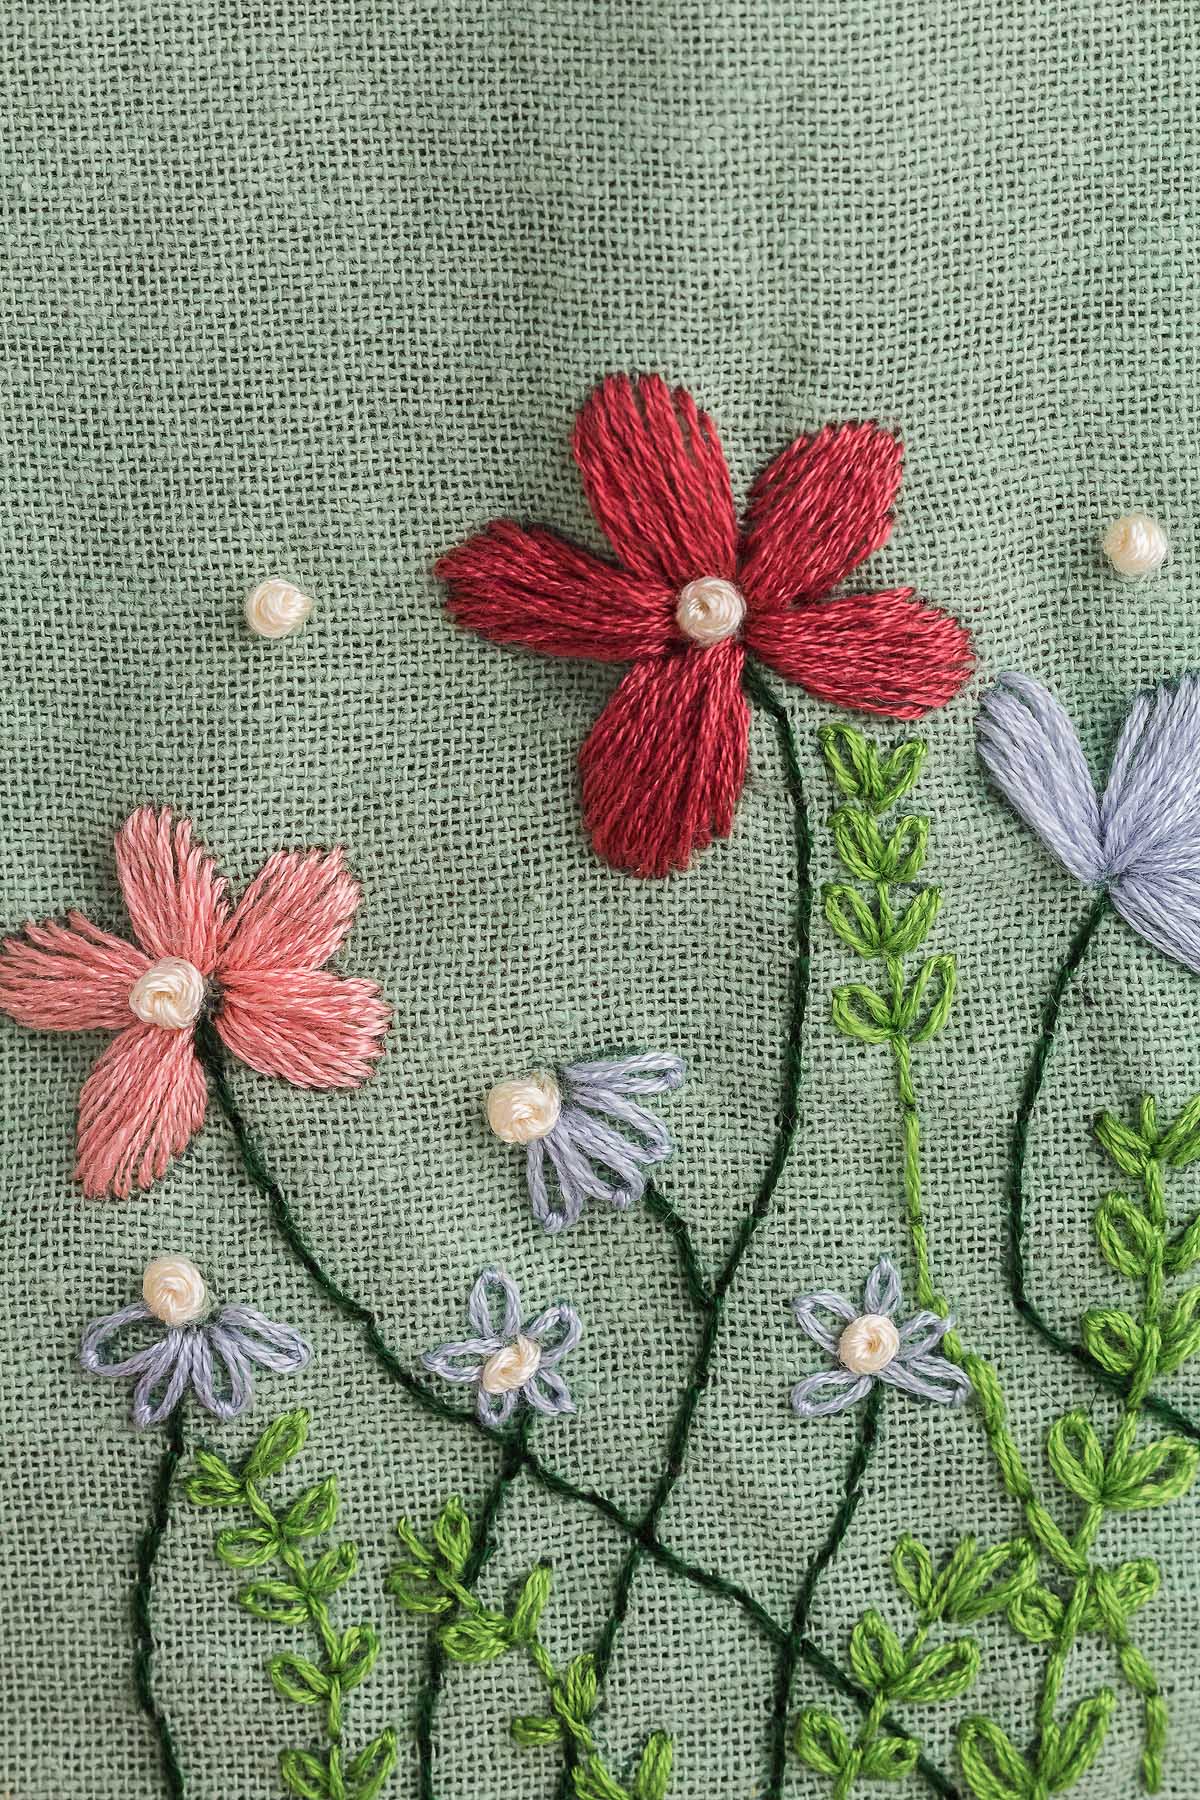
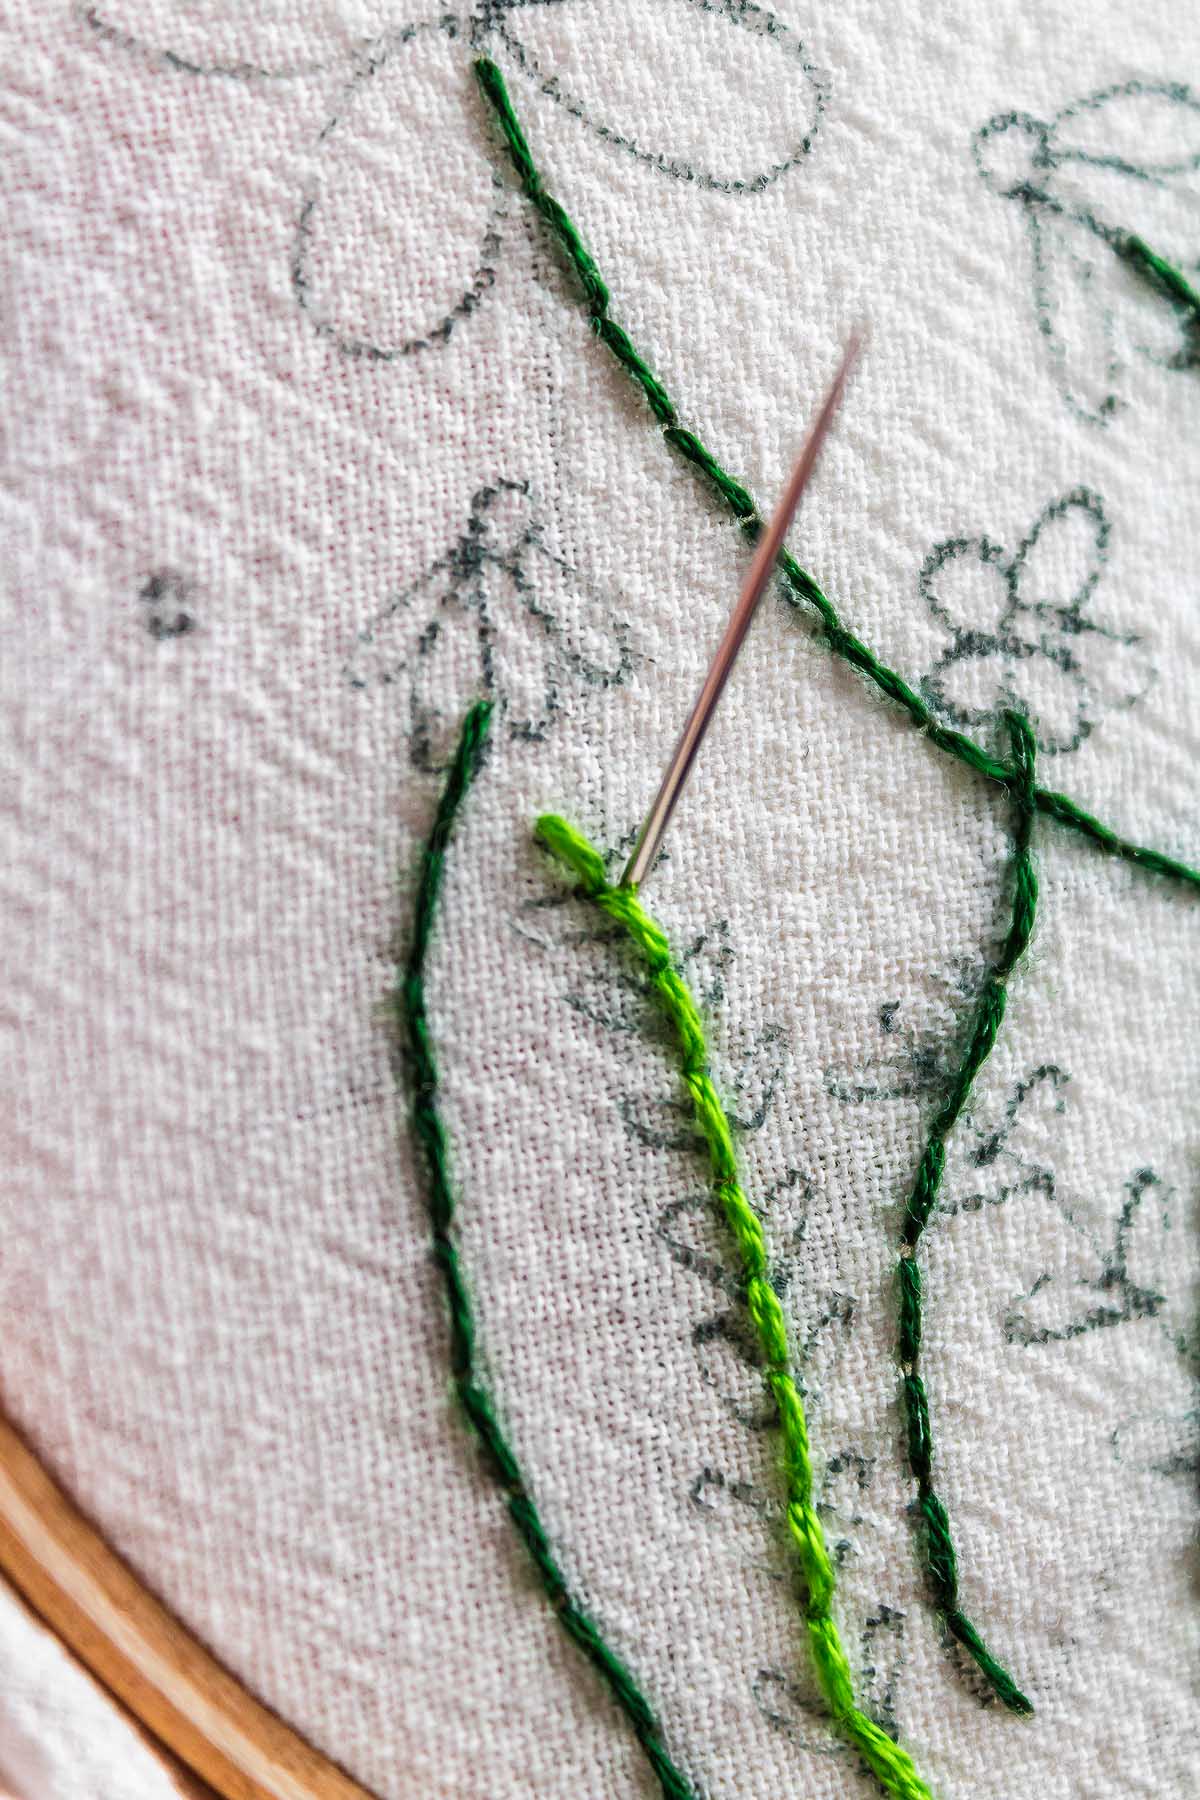
Embroider the stems and leaves: Embroider the stems and leaves using dark green and light green embroidery floss.
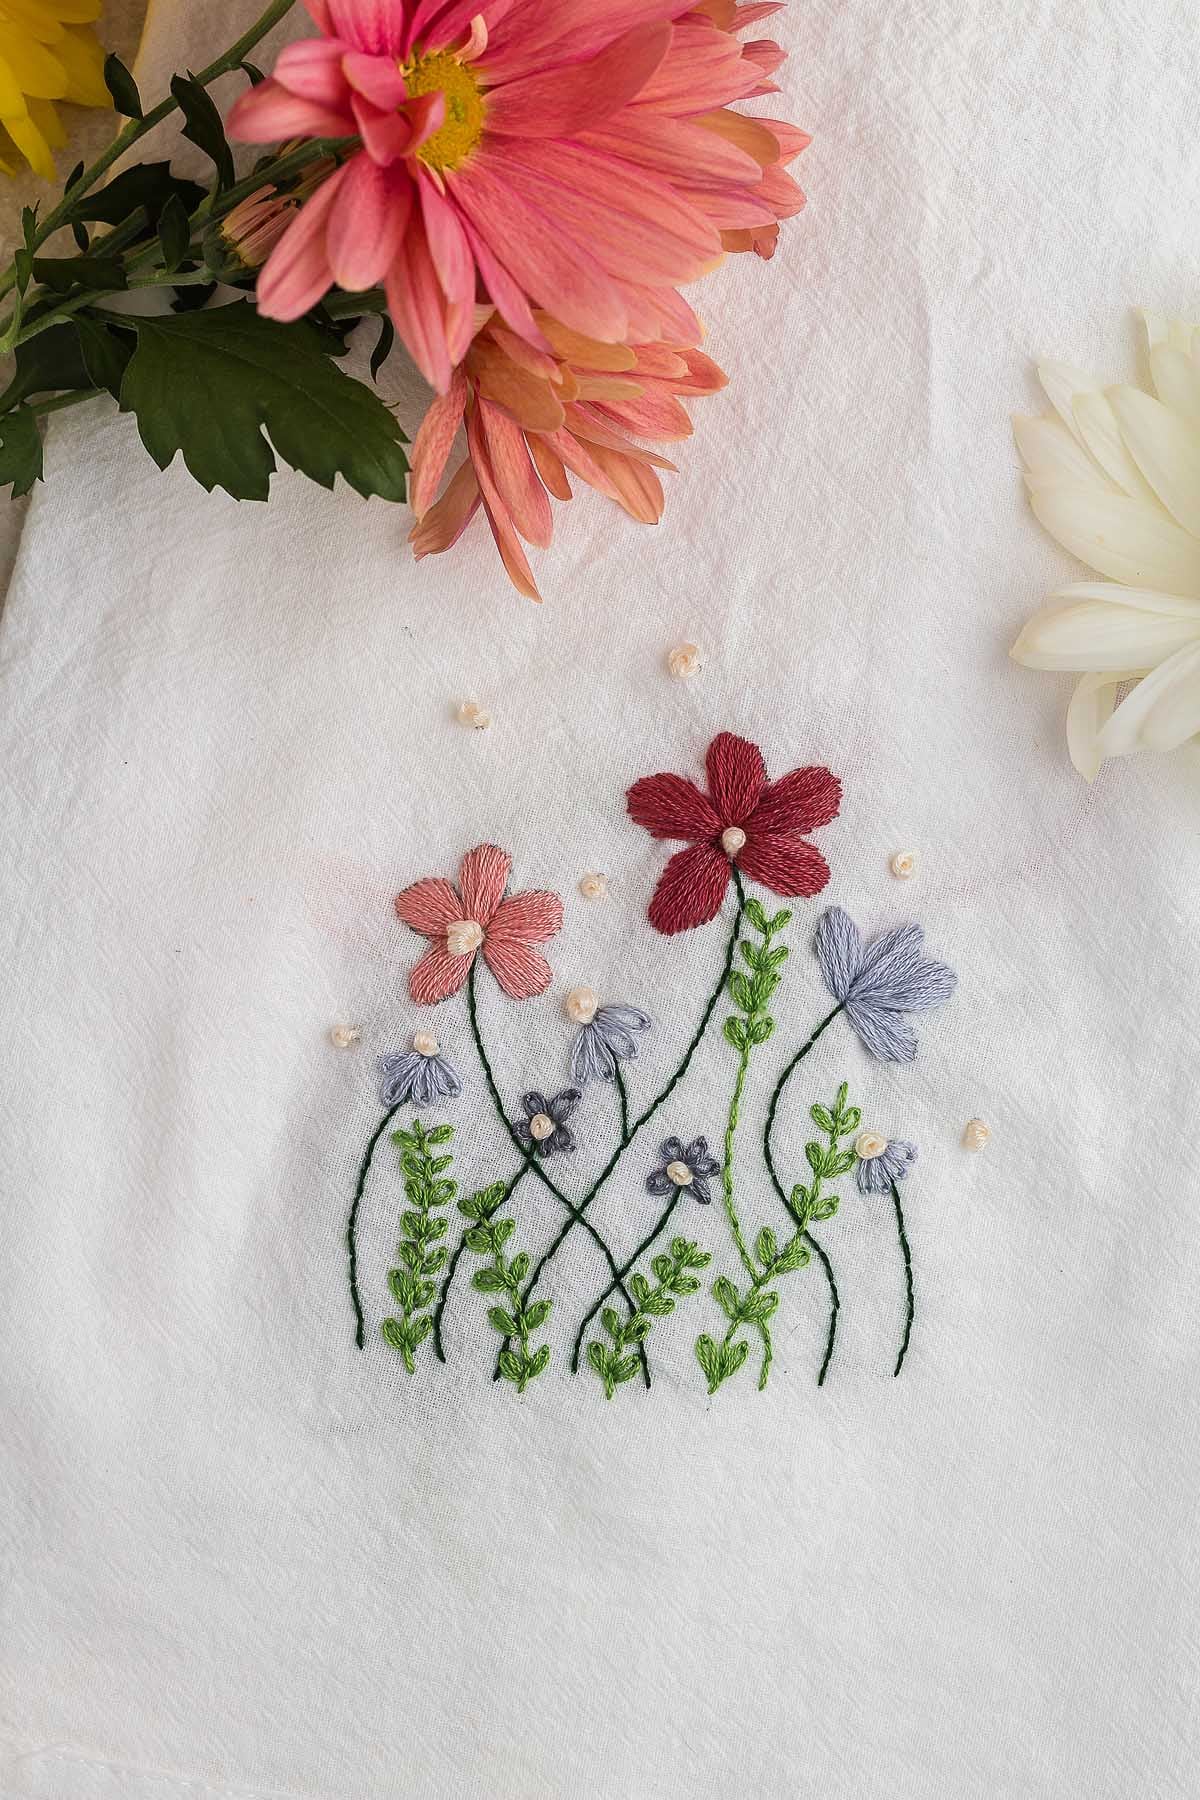
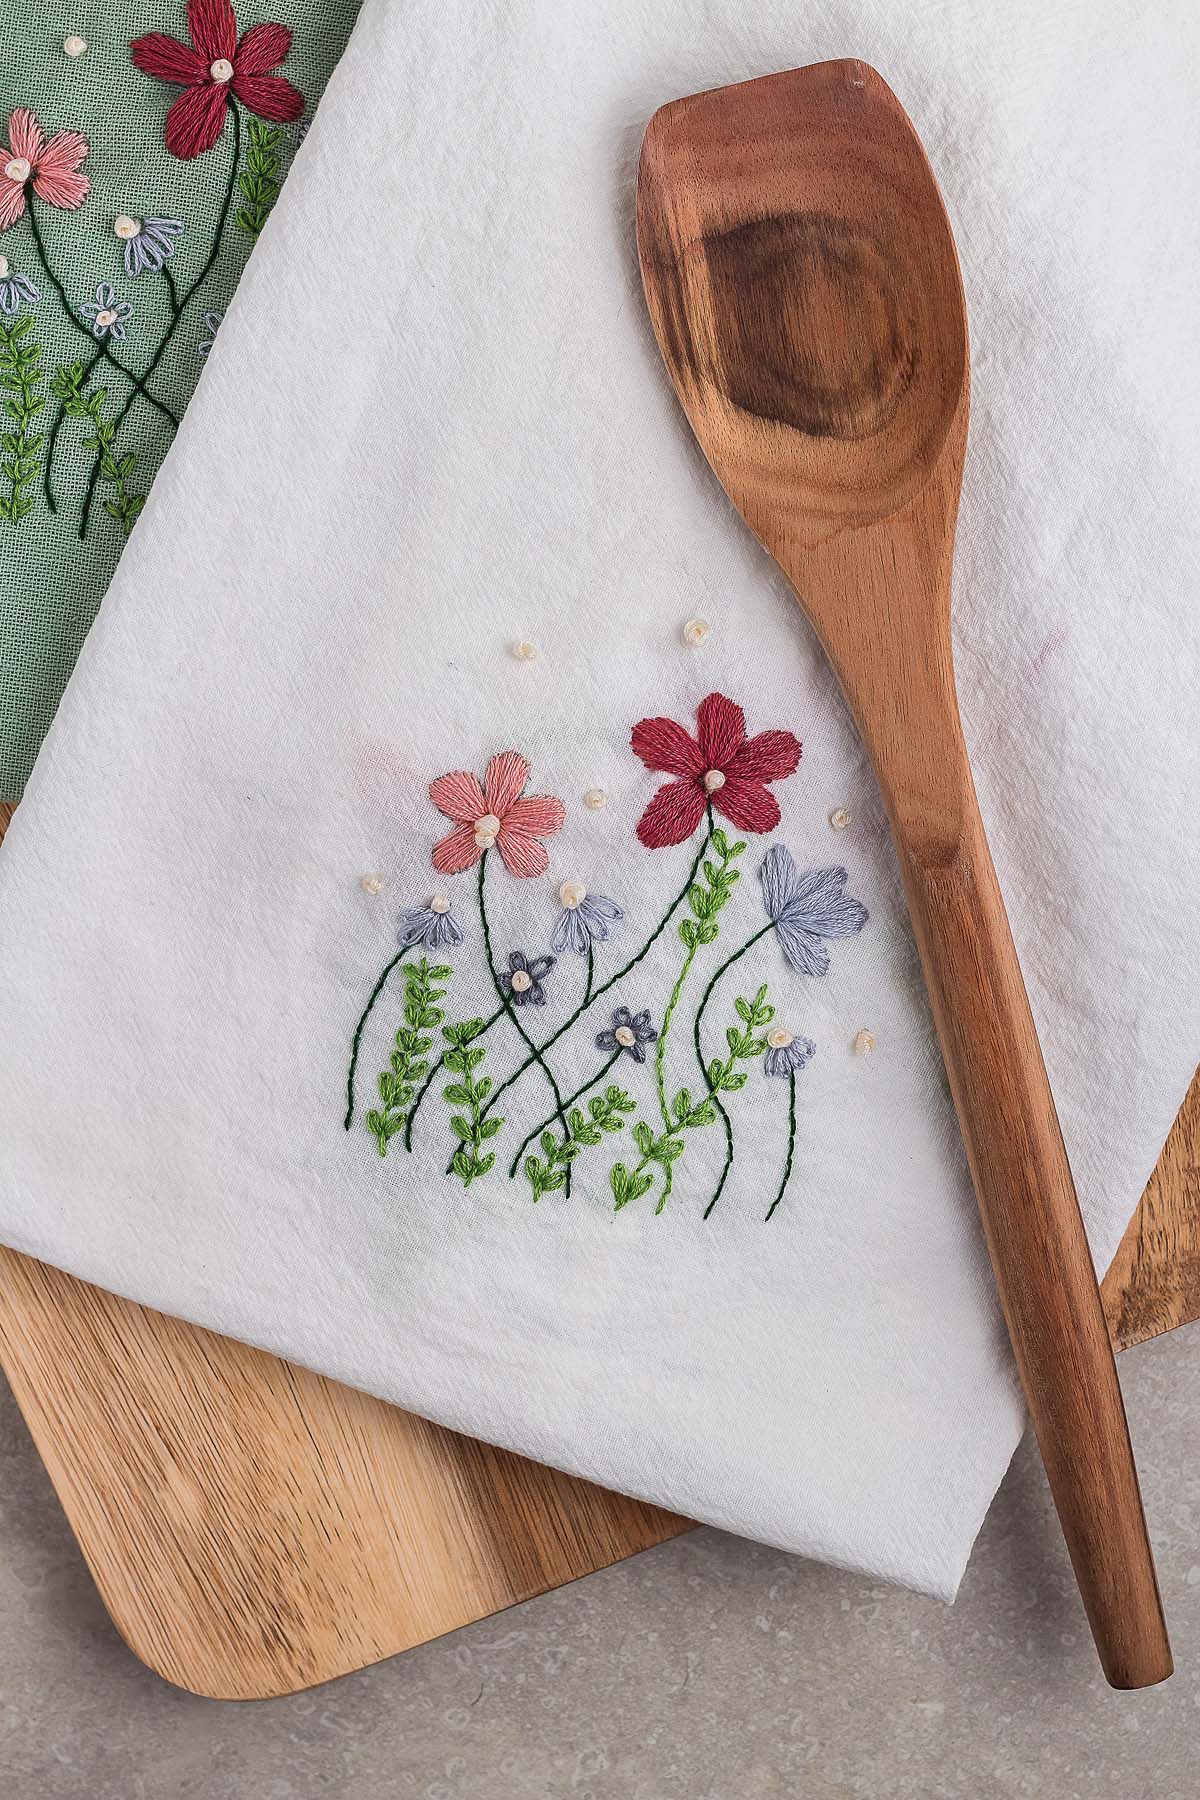
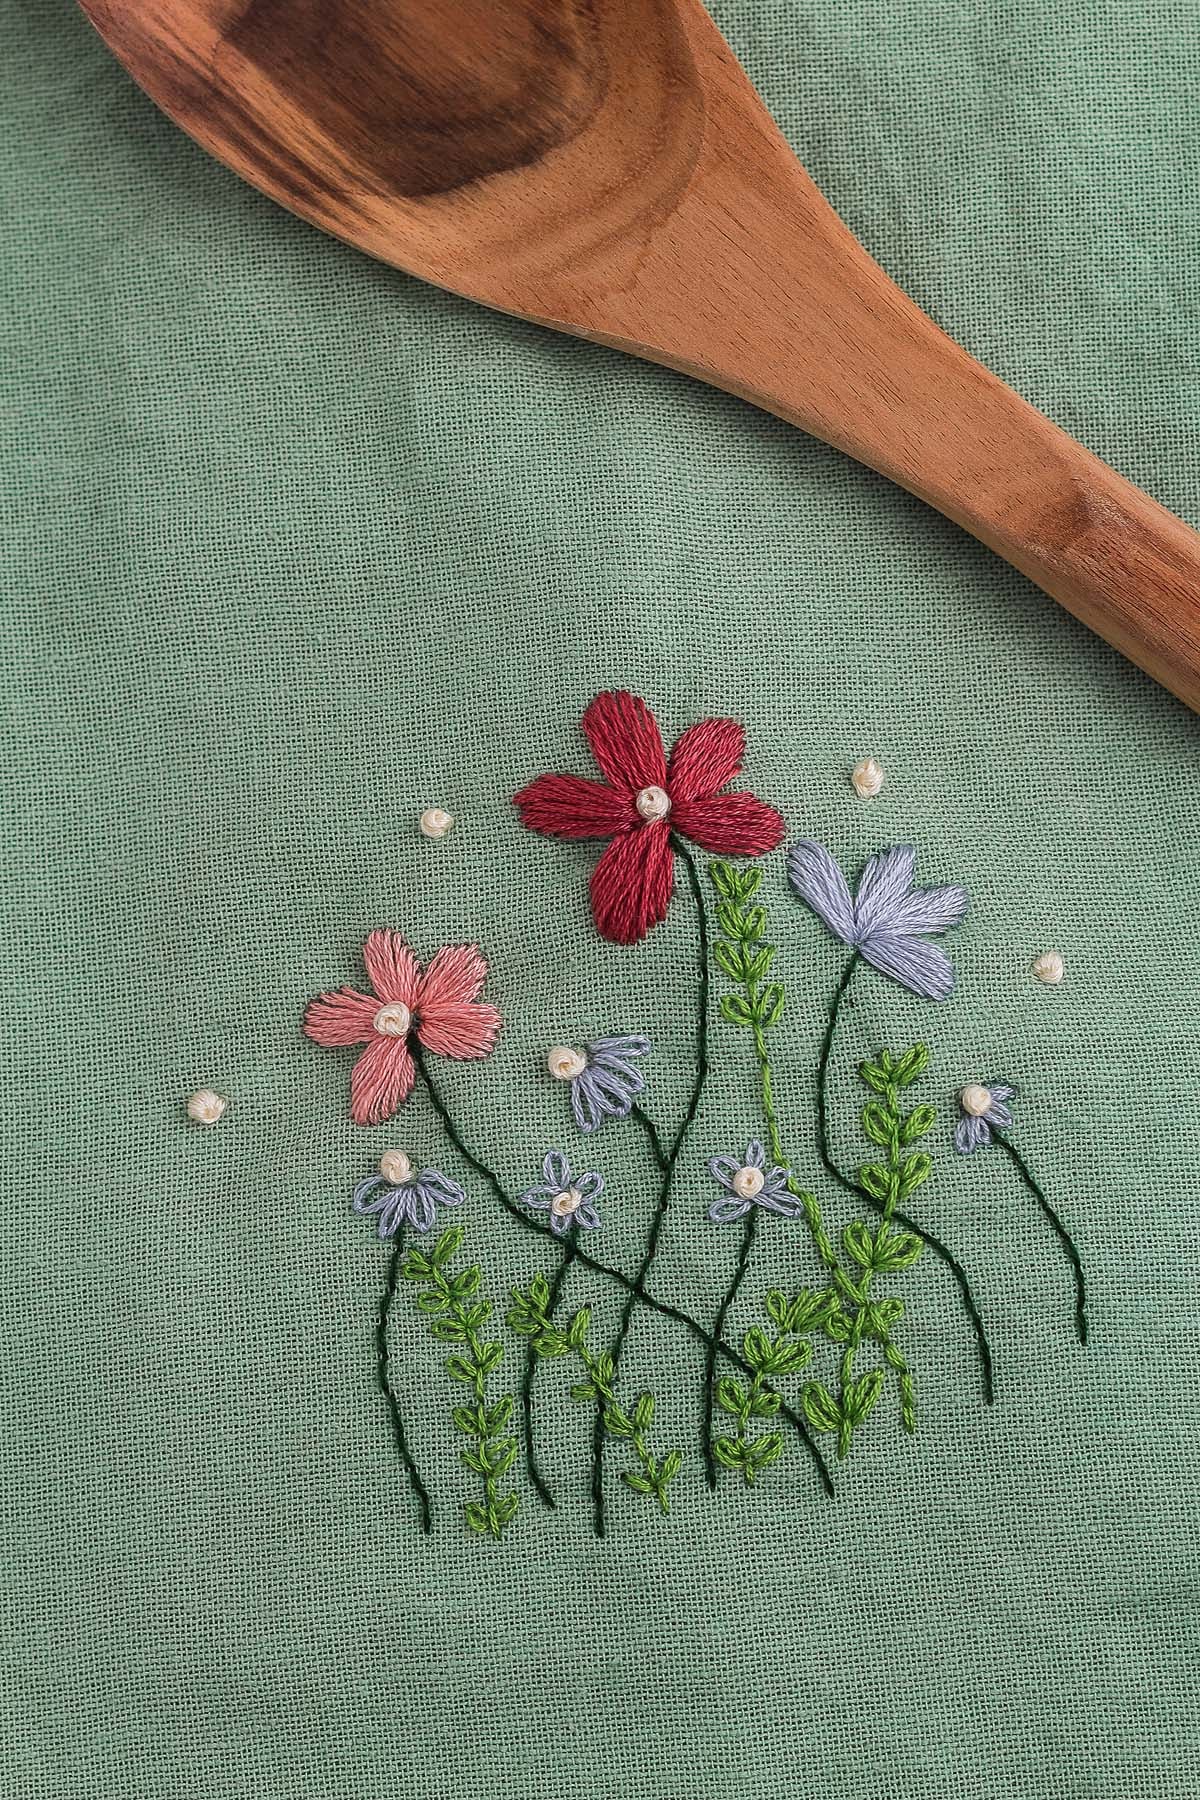
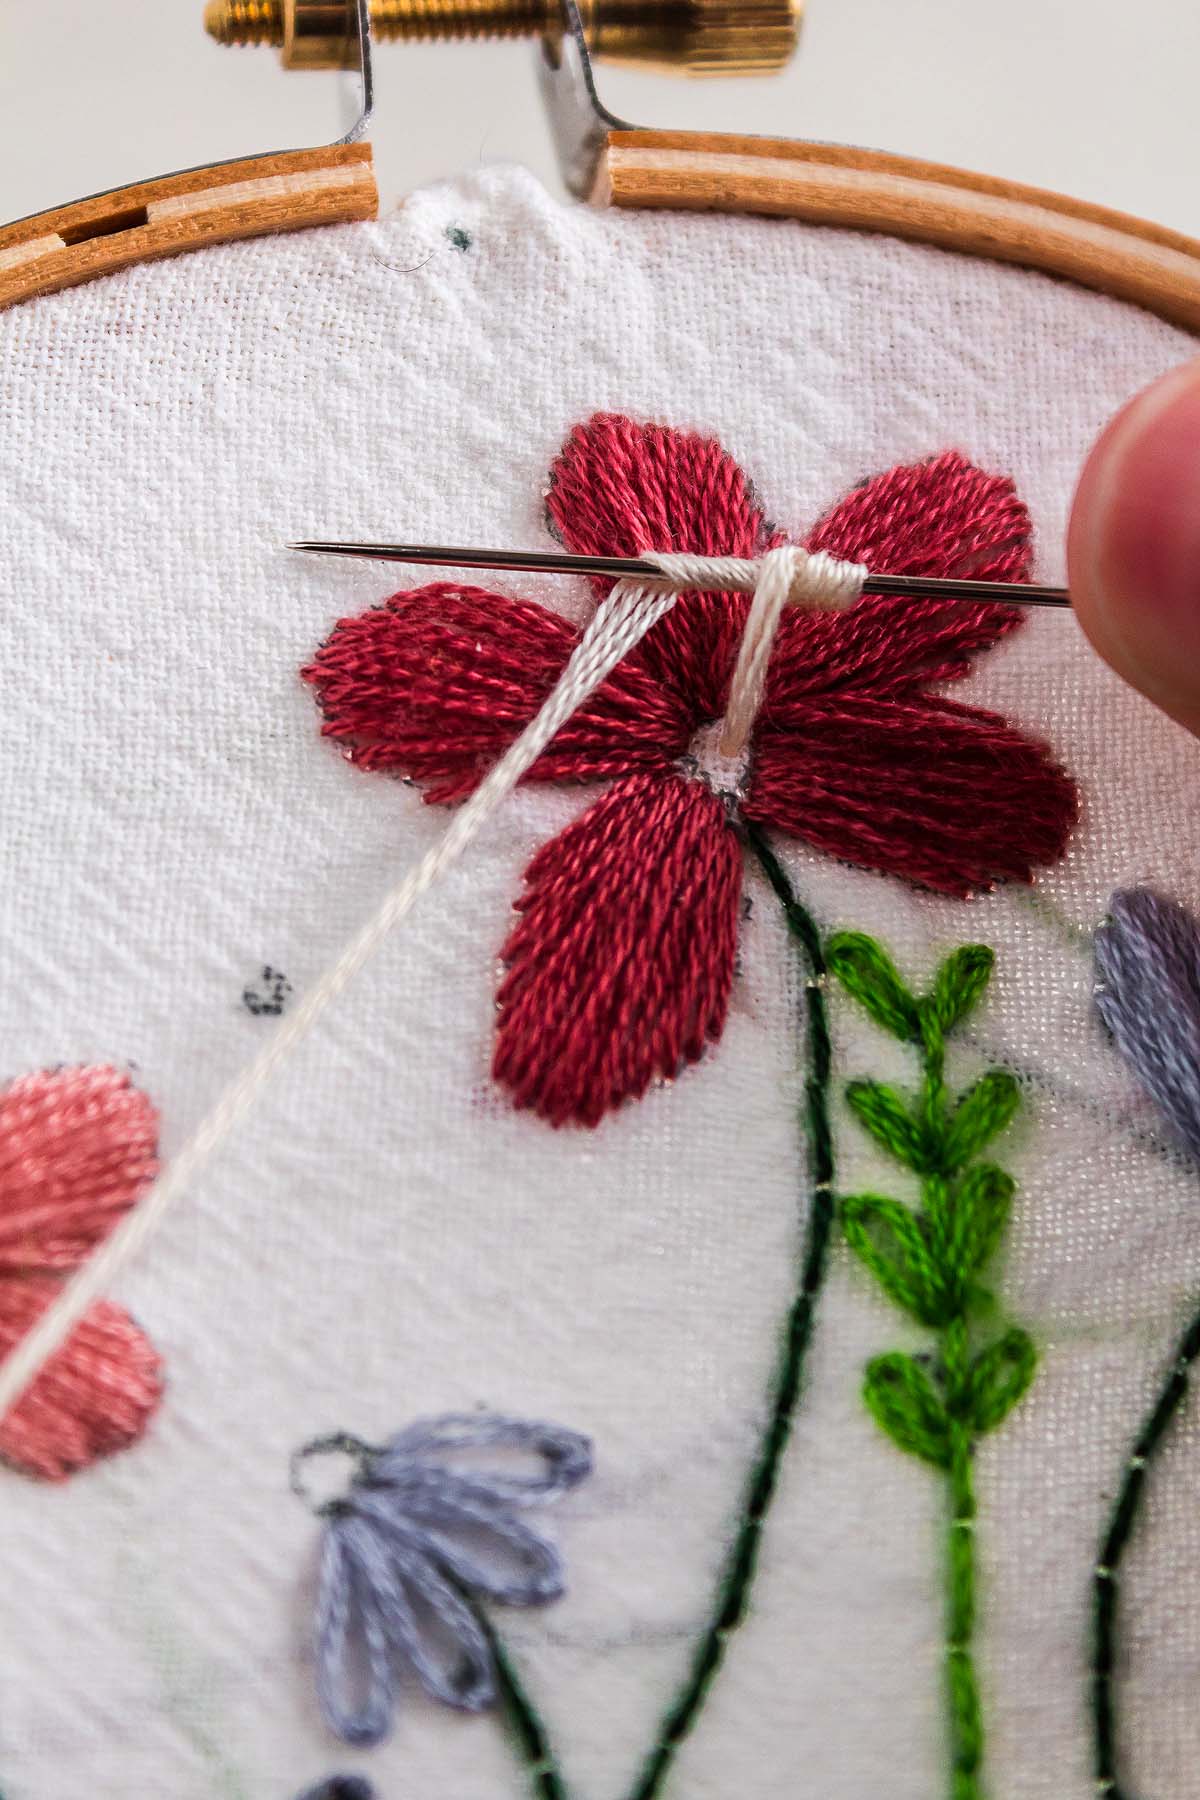
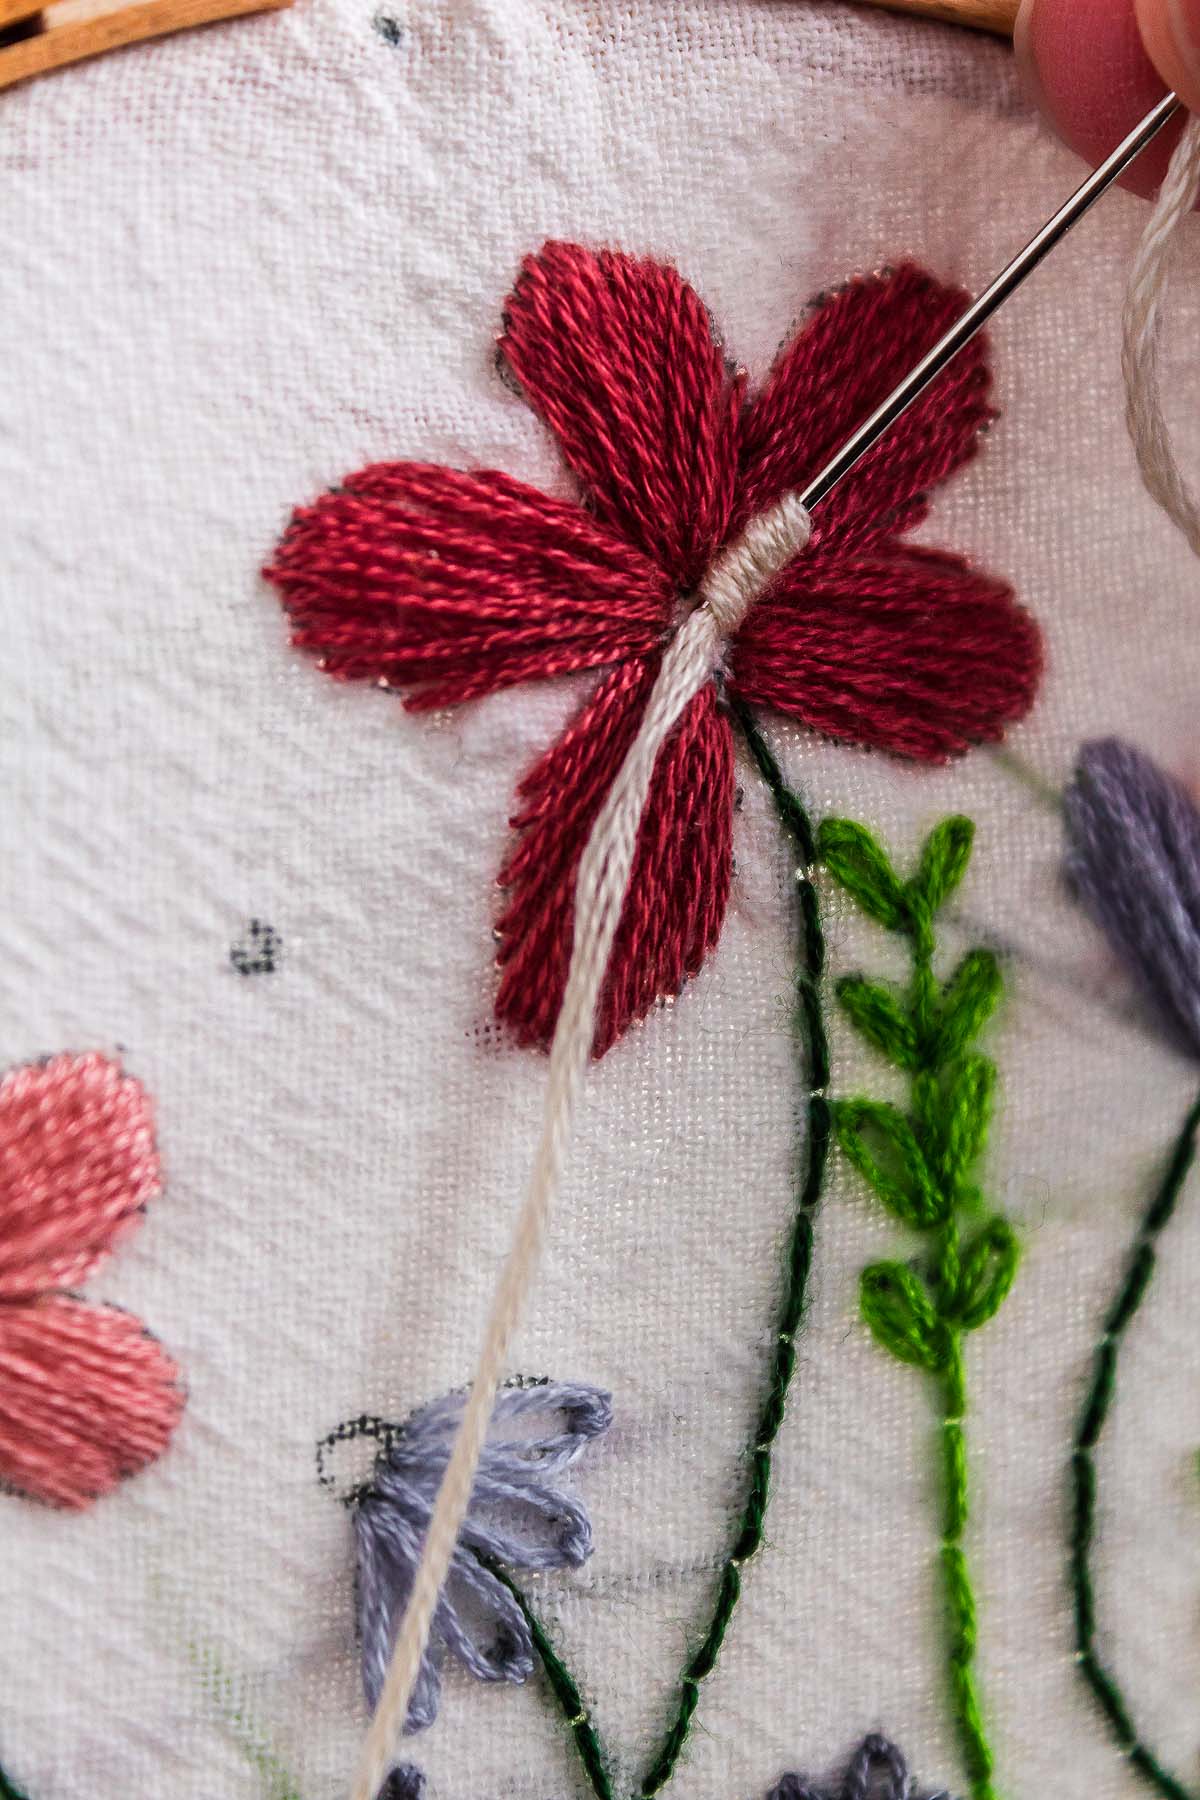
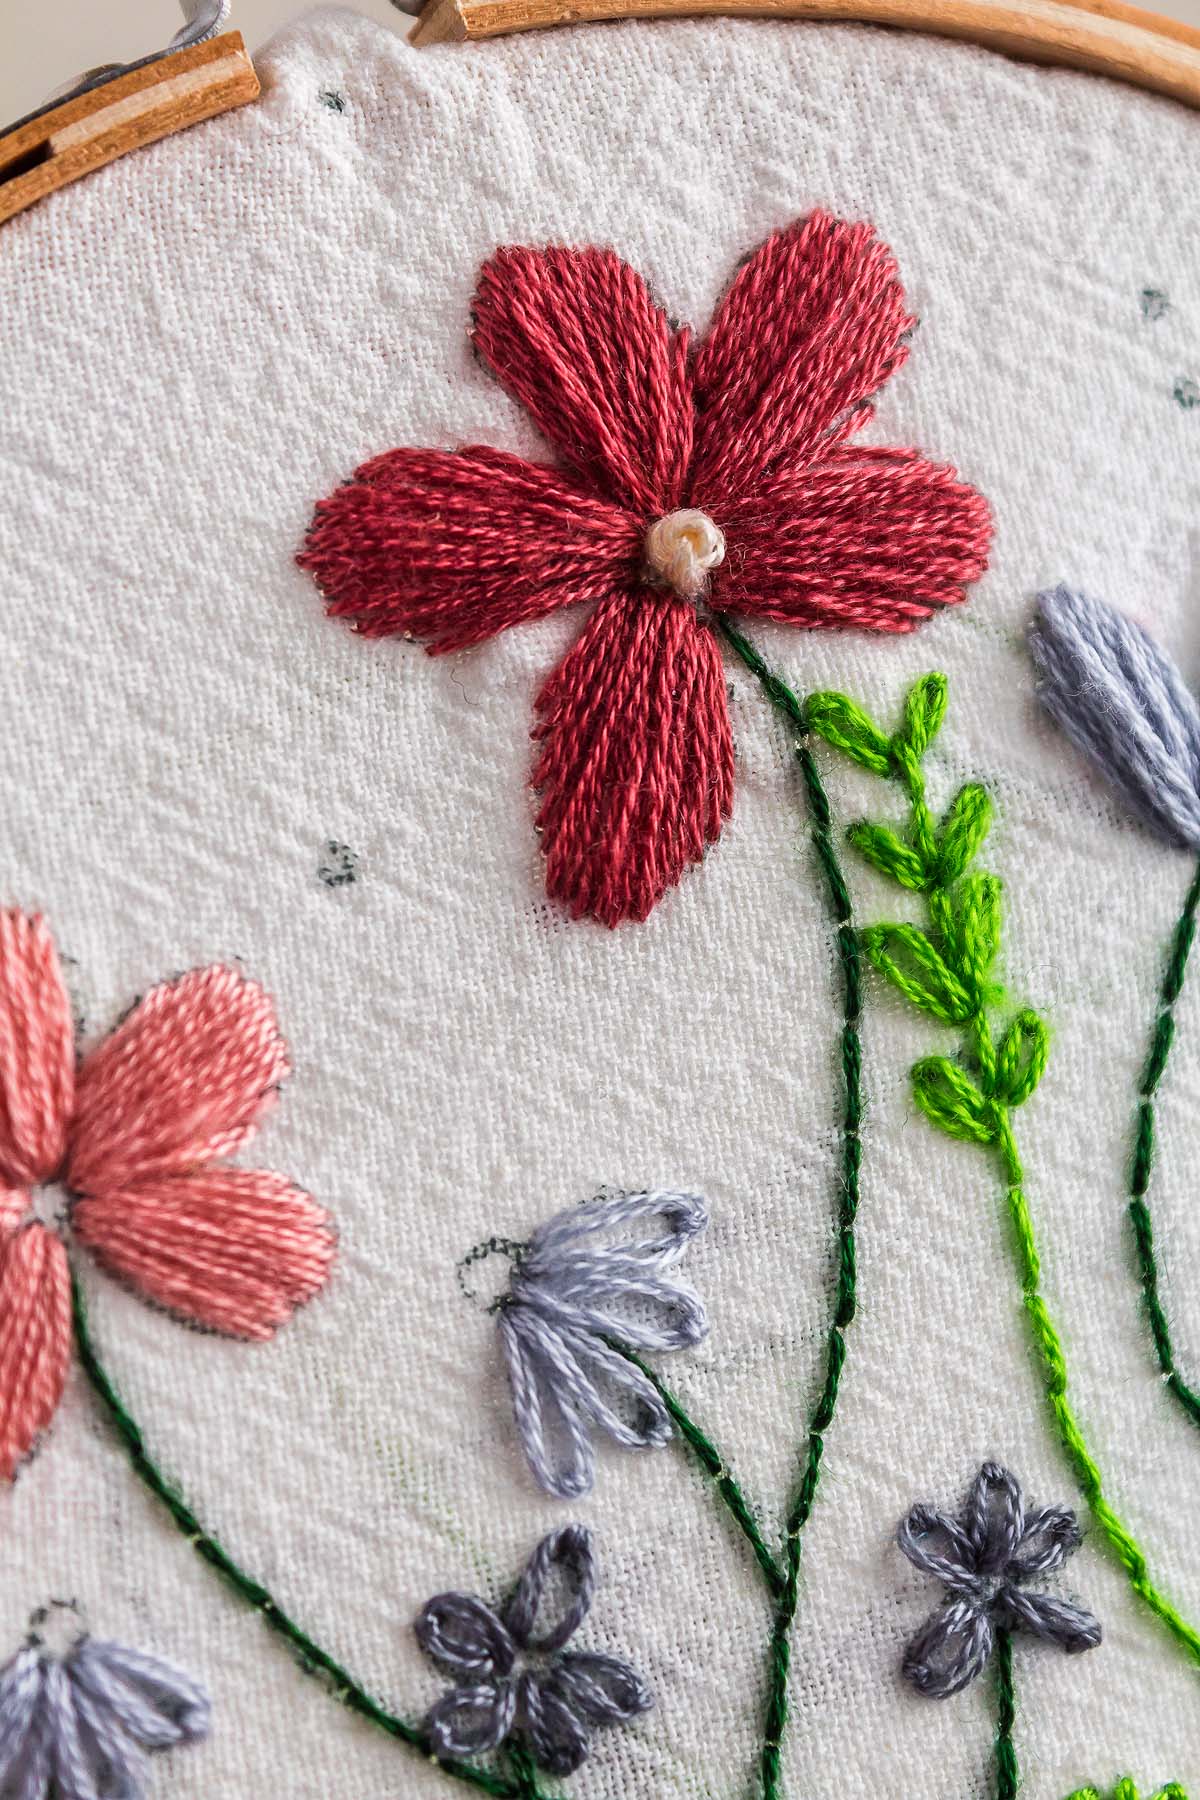
Add the flowers: Embroider the flower petals using your preferred embroidery thread colors. Sew on the flower centers and decorative dots.
Finishing the project: Leave the back unfinished if the towel is only for decoration, apple an iron-on adhesive sheet to cover the back to hide the back, or glue on a piece of scrap fabric to cover it.
Tea Towel Embroidery Pattern Download
Substitutions and Variations
Flour sack towels: While you could use other towels for this embroidery project, tea towels will work the best and be the easiest to embroider on because of how thin they are and how stretched they can get on the hoop.
Embroidery floss: You can use any kind of thread but I recommend embroidery floss because you can pull it taut and its softness means a prettier result.
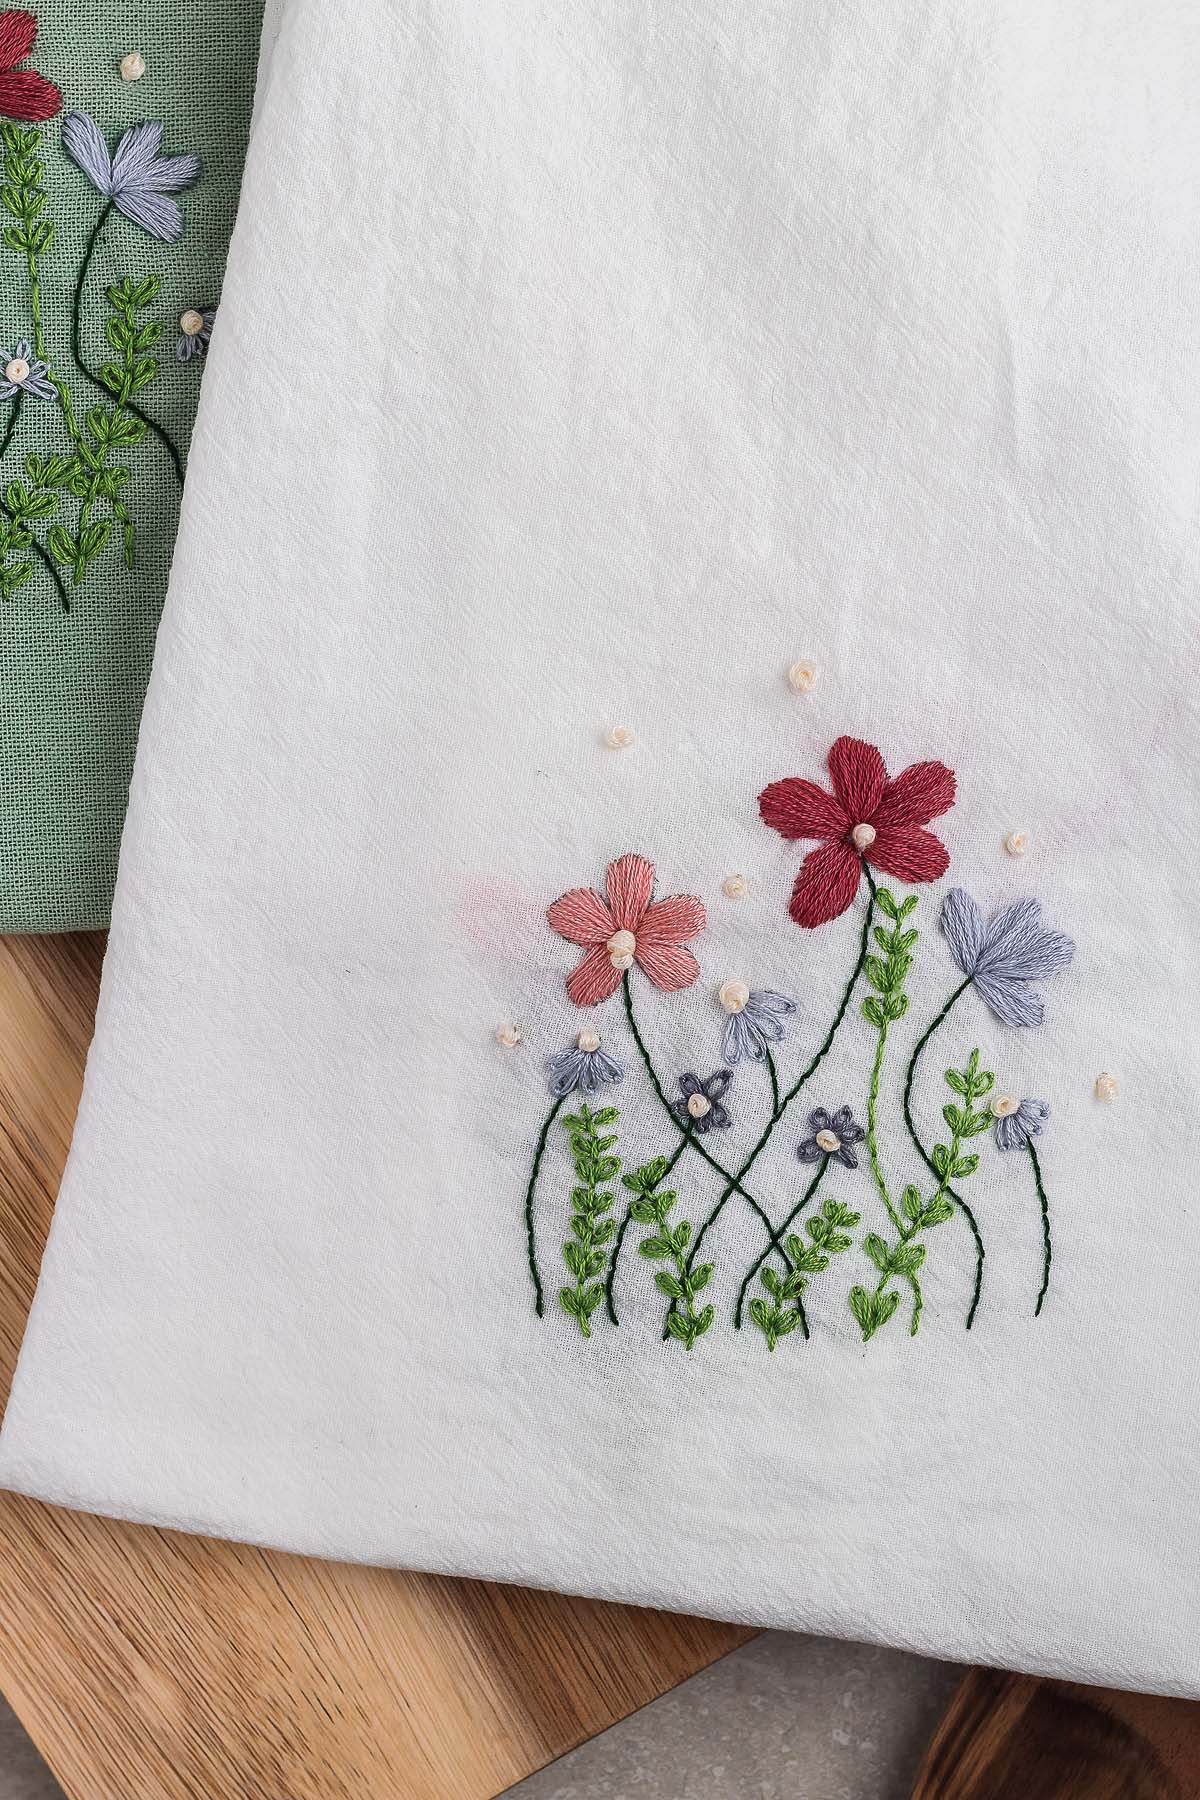
How to Use Embroidered Tea Towels
For decoration: You don’t need to finish the underside if the towel is just for decoration.
For use as a towel: These towels are fully functional as tea towels.
For gifting: They make great gifts, perhaps along with other homemade goodies like DIY shower steamers or birdseed ornaments.

Top Tips
Get creative with colors: You can use any colors for this project, so feel free to get creative with different threads to make the flowers pop! If you want to recreate this version, I used colors 3722, 3801, 890, 414, 415, and ecru from this pack of embroidery floss.
Take your time: Be patient with yourself as you’re stitching, taking your time to avoid having to take stitches out frequently.
Larger or smaller design: If you end up printing the design larger or smaller than the original, move the embroidery hoop around after completing each section in case there are any parts that are cut off in the original hoop position.
Embroidering on a Flour Sack Towel FAQs
You can if you like. Washing the flour sack towels and laying them flat to dry will remove any creases left from being folded.
Although they’re often confused for kitchen towels, cheesecloth or dishcloths, flour sack towels are vintage towels made from thin cotton threads. They’re used the same way as regular kitchen towels – for cooking, cleaning and serving, and found in homes and restaurants. These multitasking towels might sound like coarse rags but they’re actually the opposite: lint-free, highly absorbent and made from pure cotton. They’re also washing machine friendly and of higher quality than what you find in department stores.
Are you already familiar with cross stitch, daisy stitch, running stitch, and back stitch? How about cross stitching? These basic stitches aren’t hard to learn. Just follow the instructions in the tutorial. If you are more experienced, you can use any stitches you want to personalize the towels.

Embroidery on Flour Sack Dish Towels
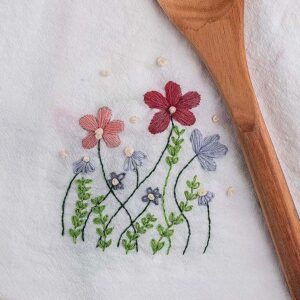
DIY Embroidered Flour Sack Towels
Equipment
- Embroidery Hoop 8-Inch
Instructions
Step 1:
- Print the embroidery pattern, and place it on the underside of the flour sack towel where you want the embroidery to be placed. You will be able to faintly see the pattern through the towel.
- Trace the pattern with a light pen or water soluble marker. To make this easier, you can tape the pattern to a window, and trace to see it easier.
Step 2:
- Center the traced design on the embroidery hoop with the bamboo ring on the back of the towel.
- Place the adjustable hoop on top of the towel and gently stretch the material taut before screwing the hoop shut.
Step 3 (dark green stems):
- For the dark green stems, cut about three feet of embroidery floss. There will be six individual strands. Gently pull apart the floss so you have 2 or 3 strands to work with. (This makes the floss thinner so it will lay better once the project is complete).
- Tie a double knot at the end of your working string, and thread the other end through a needle with a few inches of excess to keep the string from falling out of the needle.
- Pull the needle up through the back of the fabric making sure that it comes out at the bottom of the traced line on the front. Pull the floss through the fabric until it stops from the knot tied in the back.
- Push the needle through the front of the fabric about 1 mm above the last hole, and pull the string all the way through to complete the stitch.
- Next, pull the string through the back of the fabric about 1 mm above the completed stitch. Push the string back through the same hole that completed the last stitch. Repeat step 3b–c for the remainder of the stem.
Step 4:
- Repeat step 3 for all other dark green stems in the project.
Step 5 (light green stems with leaves):
- For the light green stems, you will repeat step 3 using the light green embroidery floss.
- When that is complete, you will move on to the leaves.
- Continuing on with the working string that is still attached from the stem, pull the string through the base of the top right leaf from the back of the fabric. Pull the string all the way through until it is taught at the back.
- From the front of the fabric, push the needle through the same hole that you just made. Push the yarn through until there is a small loop in the thread the size of the leaf leftover.
- Without pulling the string all the way through the fabric, pull the needle through the back at the high point of the leaf and through the loop of thread. Pull the string all the way through until taut.
- Push the needle through the same hole made previously at the highest point of the leaf, and pull the string all the way through. This will create a leaf on the side of the stem.
Step 6:
- Repeat step 5 for all other light green stems with leaves on the project.
Step 7 (3 large flowers):
- Repeat the first part of step 3 to attach the string to the project.
- Pull the needle through the back of the fabric at the highest point of either the leftmost or rightmost petal. Push the needle through the fabric at the point where all of the petals meet in the center, and pull the string taut.
- Repeat the above and follow the outline of the petals to know where the needle comes through the back of the fabric. Continue to push the needle through the center point where the petals meet to finish each stitch.
Step 8 (small flowers):
- Even though some of the smaller flowers are half flowers, the process for stitching them will be the same as the 5-petal small flowers.
- Repeat Step 2 to attach the string to the project.
- This stitch is called the “lazy daisy.” Pull the string through the back at the center point where all the petals meet, then push it back through the same hole.
- Pull the string through almost all the way, while leaving a small loop on the front of the project. Pull the string through the back of the fabric and through the loop. Pull the string taut.
- Push the string through the highest point of the petal and pull the string taut, this will create a petal.
- Repeat for the other petals in the flower.
Step 9 (flower centers and decorative dots):
- This stitch is called a “French knot,” and it will be used for all flower centers and decorative dots to finish up the project.
- Repeat Step 2 to attach the yarn to the project.
- Pull the yarn through the back of the fabric at the center of each flower, or the center of the traced dot.
- Wrap the string around the needle three times.
- While holding the working thread in one hand and the needle in the other, push the needle back through the same hole created in the center of each flower or dot.
- Pull the thread all the way through the back to make sure it is taut. This will create a small knot to finish off each flower center.
Finishing the Back:
- There are 3 options to finish the back of the project.
- If the towel used is light or decorative, you can leave the back unfinished as it will not be seen when the towel is hanging.
- (Preferred option) Cut a circle of fabric that will cover all of the loose ends and back of the project. Use an iron on adhesive sheet cut in the shape of the fabric to finish off the back. Iron this on the back as per the instructions on the iron on sheet.
- Cut a circle of scrap fabric that will cover all of the loose ends and use fabric glue to attach it to the back of the towel. Let the glue dry completely before folding the towel.
Notes
Take your time: Be patient with yourself as you’re stitching, taking your time to avoid having to take stitches out frequently.
Larger or smaller design: If you end up printing the design larger or smaller than the original, move the embroidery hoop around after completing each section in case there are any parts that are cut off in the original hoop position.


DIY embroidered flour sack towels are fun and simple to make and you can embroider some for your own kitchen and perhaps others as thoughtful, useful gifts. You don’t need many materials for this fun crafting project. So, whether you’re a keen embroiderer already or just starting to learn, give this embroidered kitchen towel project a try and you’ll be hooked from the first stitch on this simple design.
Other Crafts to Try
Bella Bucchiotti
Bella Bucchiotti is a Canadian-based syndicated food, travel, and lifestyle writer, photographer, and creator at xoxoBella. She founded xoxoBella in 2015, where she shares her love for food, dogs, sustainability, fitness, crafts, outdoor adventures, travel, and philanthropy to encourage others to run the extra mile, try new recipes, visit unfamiliar places, and stand for a cause. Bella creates stress-free and family-friendly recipes for weeknight dinners and festive feasts.