This post may contain affiliate links, please see the privacy policy for details.
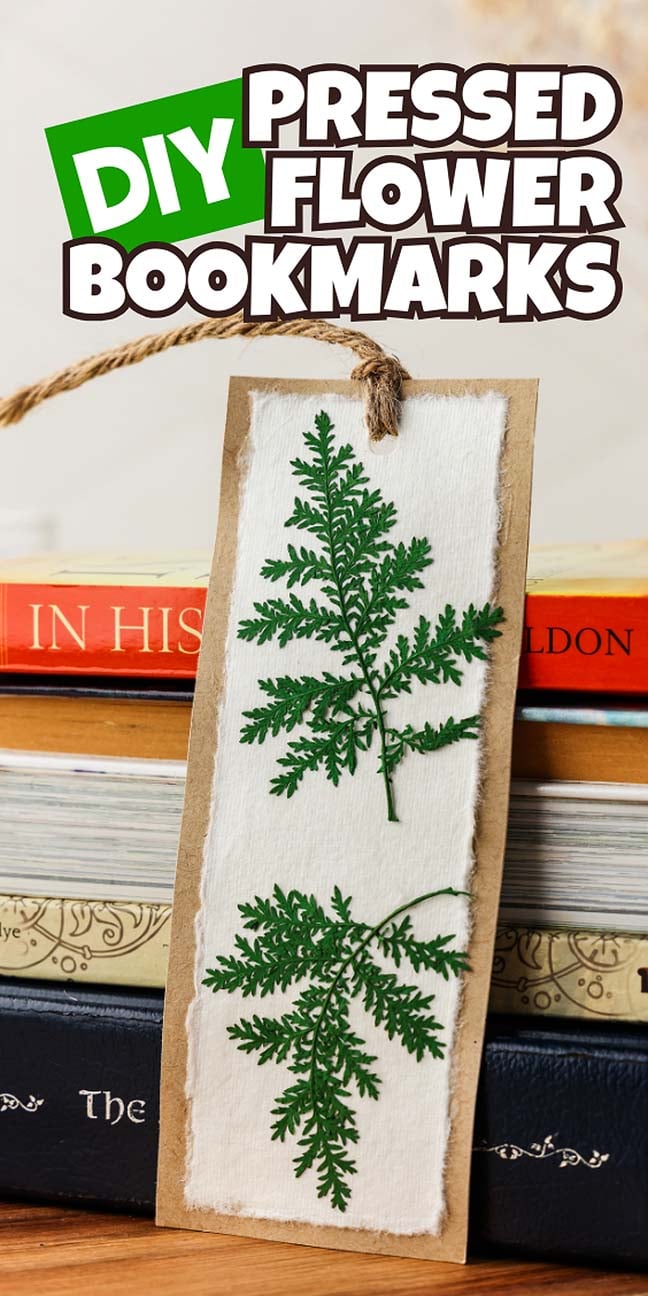
This pressed flower bookmark DIY is a lovely way to combine creativity with a love for nature and books. With just a few simple materials, you can transform fresh flowers into delicate, handcrafted bookmarks that preserve the beauty of each petal and leaf. Whether you’re making them as heartfelt gifts or keeping them to mark your own favorite pages, each one becomes a tiny, botanical work of art that adds a personal touch to every read. Let’s walk through the easy steps and handy tips to craft your own floral masterpiece!
Whether you’re a seasoned crafter or a beginner, this project offers a creative escape and a lasting reminder of nature’s beauty.
If you enjoy crafting, you might also want to make a salt dough gingerbread man garland, orange sugar scrub, or birdseed ornaments.

Why You’ll Love It
Simple yet stunning: This craft is so easy to make, but the result is a lovely, artistic bookmark that feels special.
Wonderful gifts: Pressed flower bookmarks make thoughtful, handmade gifts for book lovers, teachers, and friends.
Long-lasting blooms: Collecting flowers all year round is a great idea for drying and using in a durable, functional keepsake.

Homemade Pressed Flower Bookmark Materials
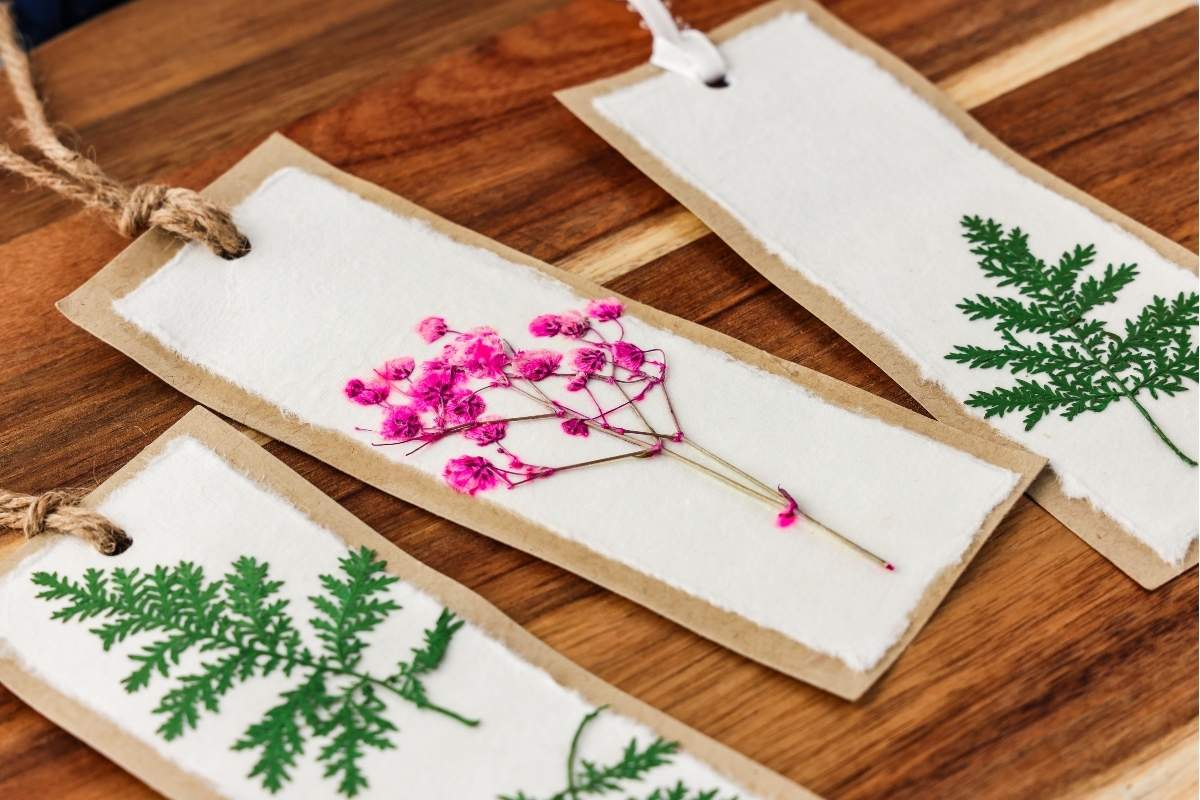
Cardstock (8.5 x 11 inch): A sturdy foundation for your bookmark.
Handcrafted paper: This unique, textured paper adds a pretty, artisanal touch to your bookmark, perfect for layering over cardstock as a decorative base for the pressed flowers. (I used this!)
Pressed flowers: Delicate pressed flowers are the focal point of this bookmark, adding beauty and charm. If using your own flowers from your yard or a florist, press flowers about two weeks ahead of making this craft. (I used these!)
Lighter: A lighter can be used with care to gently seal the edges of ribbon or twine, preventing fraying.
Paper cutter: A paper cutter helps get clean, precise lines when trimming cardstock or handcrafted paper.
Assorted paint brushes and sponges: Use brushes or sponges to apply an even layer of Mod Podge to attach and seal flowers. They also allow for careful touch-ups and help avoid bubbles or uneven layers.
Hole puncher: A hole puncher creates a small hole at the top of your bookmark for adding a ribbon or twine, giving it a polished, finished look and an easy way to locate your spot in a book.
Mod Podge crafting glue: Use matte adhesive to secure the pressed flowers to the bookmark and provide a protective seal over the entire design.
Ribbon and twine: Add a ribbon or twine at the top of the bookmark.
Tweezers: These allow you to handle pressed flowers delicately, preventing damage or tearing.

How to Make Pressed Flower Bookmarks
Cut the cardstock base: Trim the cardstock into strips. Set aside once done.
Prepare the handcrafted paper: Fold the handmade paper in half to create two sections.
Tear the paper for a natural edge: Gently tear it along the fold line to give it a natural, rustic edge. To make the tearing easier, re-fold the paper along the same line a few times to weaken it. Dampen your finger and lightly run it along the fold.
Carefully tear along the fold: Slowly and carefully pull the paper down the center fold.
Apply Mod Podge to the paper: Brush a thin layer of Mod Podge on one side of the handcrafted paper.
Attach the paper to the cardstock: Press the glued side of the handcrafted paper onto the center of the cardstock strip. This framing effect will make your bookmark look polished.
Dry and flatten: Allow the Mod Podge to dry. If the bookmark starts to curl, gently bend it in the opposite direction or press it under a heavy book.
Prepare the flower placement area: Once dry, apply a thin layer of Mod Podge where you want to arrange flowers.
Arrange all the flowers with tweezers: Use tweezers to carefully place the pressed flowers onto the glued area.
Seal the flowers: Once the flowers are in place, dab a thin layer of Mod Podge over them using a sponge. The glue will dry clear, preserving the natural look of the flowers.
Add a hole for the ribbon: When the bookmark is fully dry, punch a hole at the top, leaving about ¾ inch of space from the edge.
Add and seal the ribbon: Thread a ribbon through the hole and lightly run a flame over the cut edges of the ribbon to prevent fraying.

Variations
Herbal pressed bookmarks: Use dried herbs like lavender, rosemary or mint instead of flowers. Arrange and press the herbs like flowers, applying Mod Podge to secure them to the cardstock or paper base. Pair with kraft paper for a natural, rustic look, or layer the herbs under thin parchment paper for a soft, vintage feel.
Leafy bookmarks: Use small dried leaves or ferns to create an organic, forest-inspired look. Seal the leaves with multiple thin layers of Mod Podge to preserve the delicate details and colors.
Geometric-shaped bookmarks: Go for sturdy cardstock cut into triangles, circles, or even hexagons for a unique, modern bookmark shape. Arrange small pressed flowers, grasses, or moss in geometric patterns.
Nature-inspired laminated bookmarks: Use a lamination sheet to encase tiny wildflowers, grasses, or delicate petals for a crystal-clear view showing each plant’s details.
Pressed grasses and wheat stalks: Try dried wheat, grass heads, or small reeds for a countryside look.
Botanical bookmark with fabric accents: Use muslin, burlap, or linen as the base instead of cardstock for a soft, tactile bookmark that’s fabric-backed.
Gold-leaf embellished botanical bookmarks: Add small pieces of gold or silver leaf for a touch of elegance. Place the metallic accents to frame the flowers or as small, scattered embellishments to catch the light.
Vintage paper bookmarks: Use vintage paper, old book pages, or sheet music for the pressed flowers as the background. Layer dried flowers or herbs over the vintage paper, combining with light brown or parchment-colored cardstock for an antique effect.

Top Tips
Pressing flowers properly: To prevent mold and discoloration, use a heavy book or a flower press and let the flowers dry completely for 1 to 2 weeks.
Handle delicate flowers with care: Use tweezers to position your flowers on the bookmark, as they’re fragile and can break easily. Tweezers give you more precision and keep oils from your fingers off the flowers.
Apply Mod Podge in thin, even layers: For best results, use a sponge brush to apply a thin layer of Mod Podge both under and over the flowers. This helps create a smooth, clear finish without streaks or bubbles.
Smooth out any bubbles immediately: After applying Mod Podge, smooth them out with your brush or finger before they dry. Bubbles can distort the flowers and affect the overall look.
Let each layer of Mod Podge dry fully: Allow each layer to dry completely to prevent cloudiness. This also keeps flowers from shifting and gives a polished finish.

Flower Bookmark FAQs
Carefully trim the edges with scissors or a paper cutter after applying Mod Podge to ensure no overhanging glue or flower petals. Use a ruler and a craft knife to trim straight lines for an extra clean look.
Mod Podge is ideal because it dries clear and can be applied over the flowers as a sealant. However, other clear-drying craft glues can also work to attach the flowers. Just ensure the glue won’t damage the flowers and dries without yellowing.
If you’d like a lightly scented bookmark, consider using aromatic dried herbs (like lavender or mint) instead of flowers. Alternatively, add a drop of essential oil on the ribbon or twine after finishing the bookmark.

Easy Pressed Flower Bookmark Tutorial

Pressed Flower Bookmarks
Equipment
- Lighter
- Paint Brushes and Sponges
- Mod Podge Matte
- Tweezers
Supplies
- cardstock, 8.5 x 11 inches
- hand crafted paper
- pressed flowers
- water
- ribbon and twine
Instructions
- Cut the cardstock into strips measuring approximately 2½ inches x 6½ inches. Set aside.
- Fold the hand-crafted paper in half, to make two sections, measuring 2 inches x 6 inches. Each hand-crafted paper will make 2 bookmarks.
- Instead of cutting the paper with scissors, we are going to tear it along the middle to create a look that is similar to the edges. To do this, open the paper back up and fold it back on the same edge that you just made.
- Repeat this step a few times to weaken the paper. With your finger, you can brush a little bit of water along the edge to help soften the edge. Be careful to not get the paper too wet. A little water works perfectly.
- When it is ready to tear, slowly tear along the middle seam.
- For an optional, rustic feel, you can *carefully* use a lighter along the edges to create a unique look. Have a little water handy because this paper is very fibrous and the flame can quickly spread further than you would think! USE CAUTION.
- On one side of the hand-crafted paper, brush a thin layer of Mod Podge.
- Press the side with glue on the cardstock bookmark, right in the middle. You should have even spacing all around the white, hand-crafted paper.
- Allow the Mod Podge to dry. If you notice that the bookmark tries to curl a little while drying, gently bend it in the opposite direction. You can also place it under a heavy book to encourage it to lay flat.
- Once dry, brush a thin layer of Mod Podge on the top of the hand-crafted paper where you would like to place the pressed flowers.
- Use tweezers to help grab and place the pressed flowers. They are tiny and delicate!
- Allow the Mod Podge to dry, and then dab a thin layer of Mod Podge on top of the pressed flowers using a sponge. The Mod Podge will dry clear!
- Once the top layer of Mod Podge is dry, use a hole punch to punch a hole through the top of your bookmark, leaving about ¾ inch headspace.
- Tie a ribbon through the hole, and carefully heat treat the ends of the ribbon with a lighter by brushing the flame quickly by the cut edges. This will keep the ends from fraying. Enjoy your new handmade bookmark!
Notes
Handle delicate flowers with care: Use tweezers to position your flowers on the bookmark, as they’re fragile and can break easily. Tweezers give you more precision and keep oils from your fingers off the flowers.
Apply Mod Podge in thin, even layers: For best results, use a sponge brush to apply a thin layer of Mod Podge both under and over the flowers. This helps create a smooth, clear finish without streaks or bubbles.
Smooth out any bubbles immediately: After applying Mod Podge, smooth them out with your brush or finger before they dry. Bubbles can distort the flowers and affect the overall look.
Let each layer of Mod Podge dry fully: Allow each layer to dry completely to prevent cloudiness. This also keeps flowers from shifting and gives a polished finish.


Creating pressed flower bookmarks DIY is a lovely way to add a bit of nature to your reading time. This simple project turns delicate blooms into charming, usable art. Each bookmark is one-of-a-kind, highlighting the unique beauty of different flowers and leaves. Whether you’re an experienced crafter or just getting started, this project provides a relaxing creative outlet and a lasting connection to the outdoors.
Other Crafts to Try
- You might also like to make some citrus shower steamers – they make great gifts too!
- Create a gorgeous succulent pumpkin centerpiece that combines the beauty of autumn with long-lasting greenery.
- Add a cozy, rustic touch to your home decor with a beautiful dried orange garland that’s easy to make and smells amazing!
- Spice up your gift-giving with a homemade BBQ rub that’s flavorful, easy to assemble, and perfect for grill enthusiasts.
- Craft the perfect gift with these mason jar cocktail sets, combining fun, flavor, and creativity in one cute package.

Bella Bucchiotti
Bella Bucchiotti is a Canadian-based syndicated food, travel, and lifestyle writer, photographer, and creator at xoxoBella. She founded xoxoBella in 2015, where she shares her love for food, dogs, sustainability, fitness, crafts, outdoor adventures, travel, and philanthropy to encourage others to run the extra mile, try new recipes, visit unfamiliar places, and stand for a cause. Bella creates stress-free and family-friendly recipes for weeknight dinners and festive feasts.