This post may contain affiliate links, please see the privacy policy for details.


Cheeseburger wellington is a creative and satisfying twist on two classic favorites: cheeseburgers and beef wellington! This recipe wraps juicy ground beef, sharp cheddar, piquant pickles, and crispy fries in golden puff pastry for a bold and flavorful dish. It’s perfect for feeding a crowd, making something special for game day, or just treating yourself to something a little extra. With a simple dipping sauce on the side and fun, familiar ingredients, this is one mashup that’s sure to be a hit with everyone at the table.

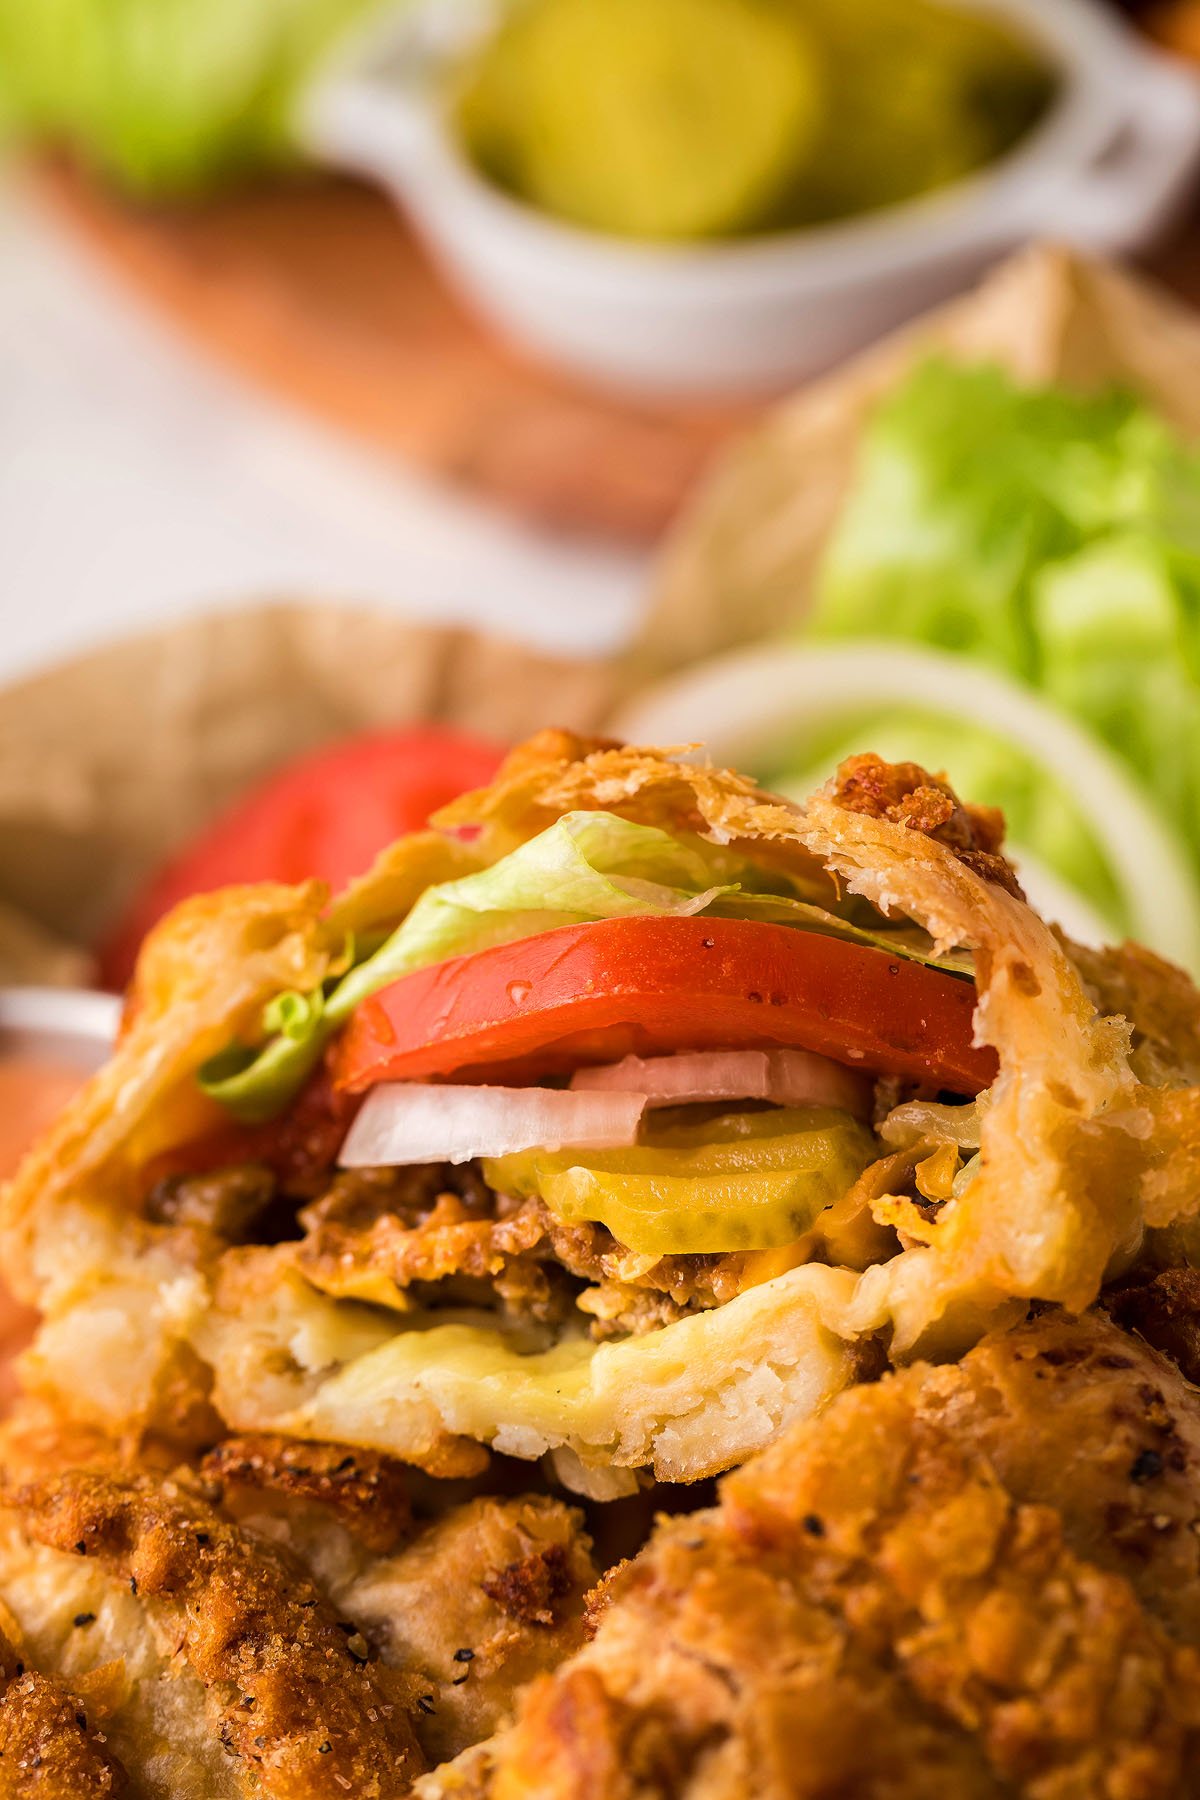
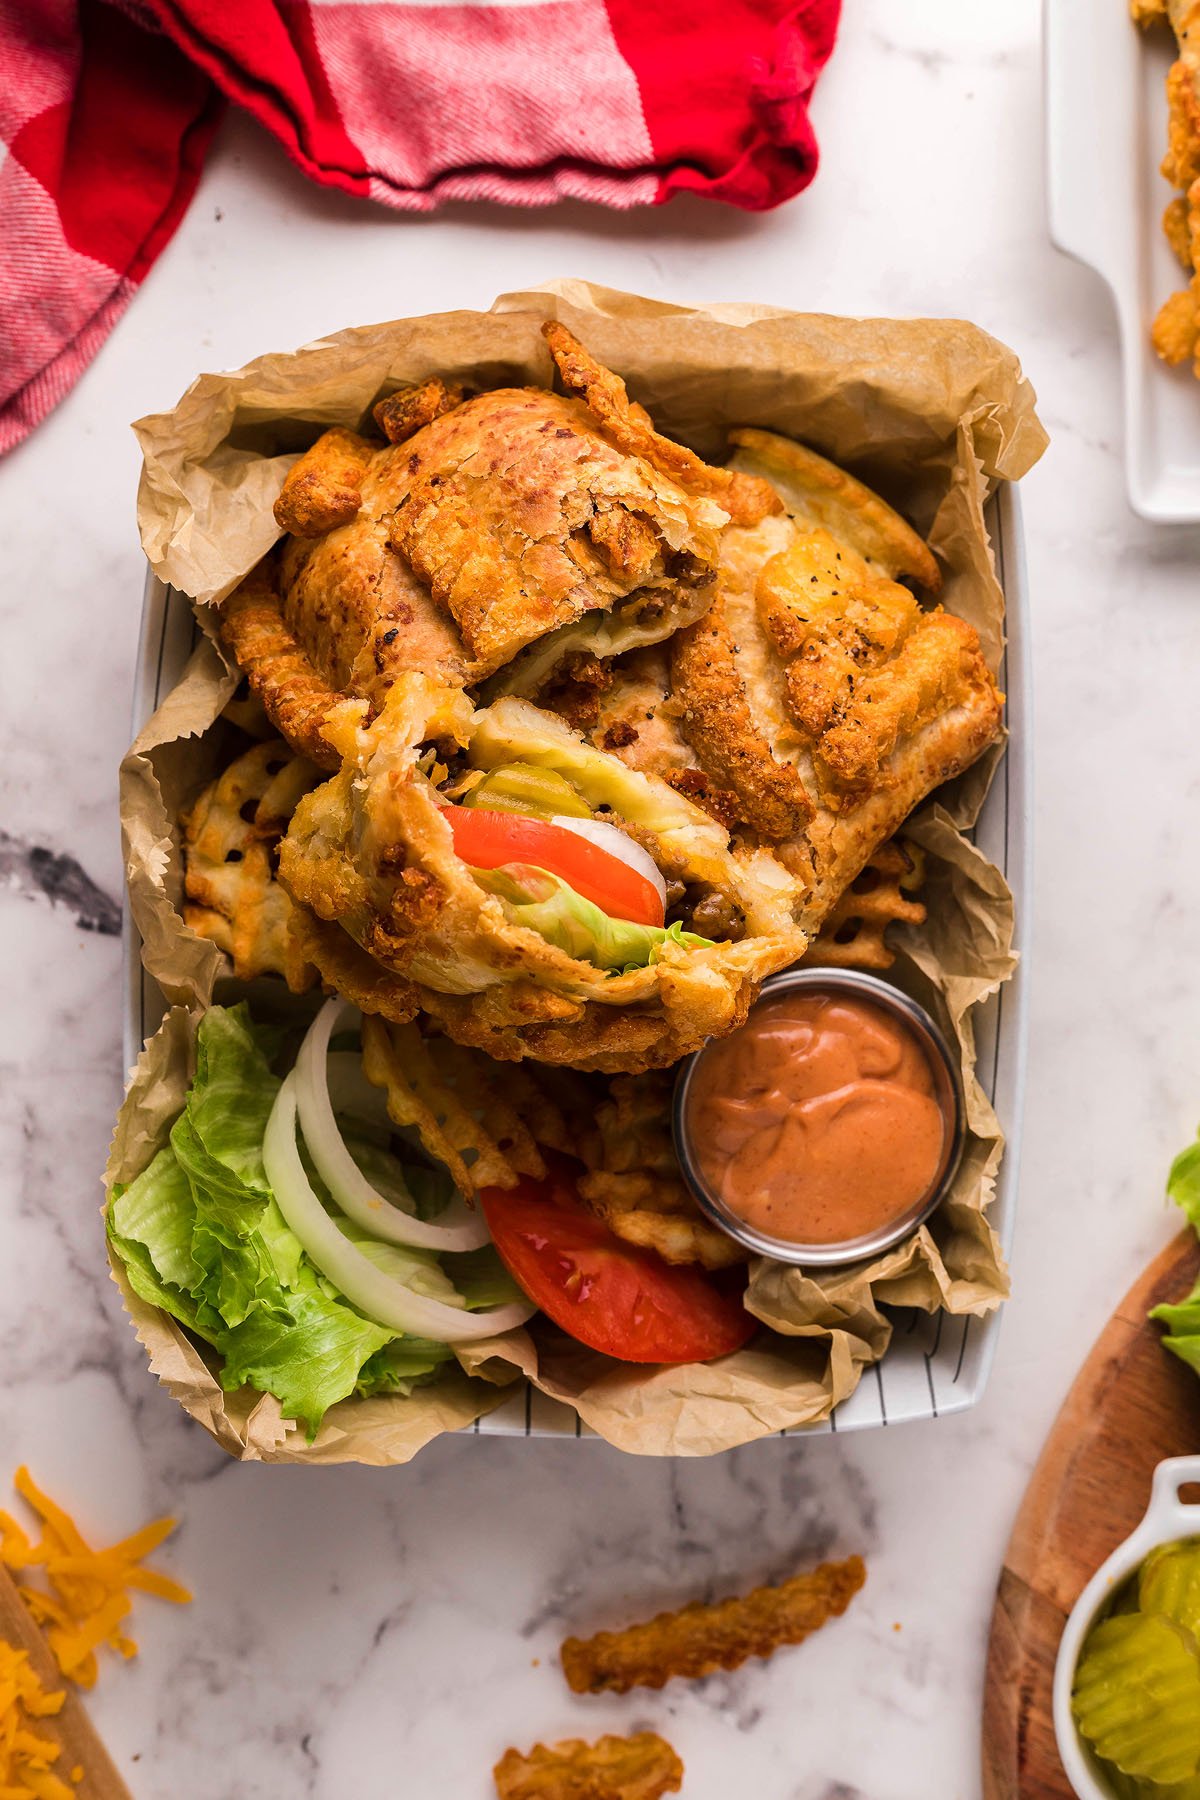
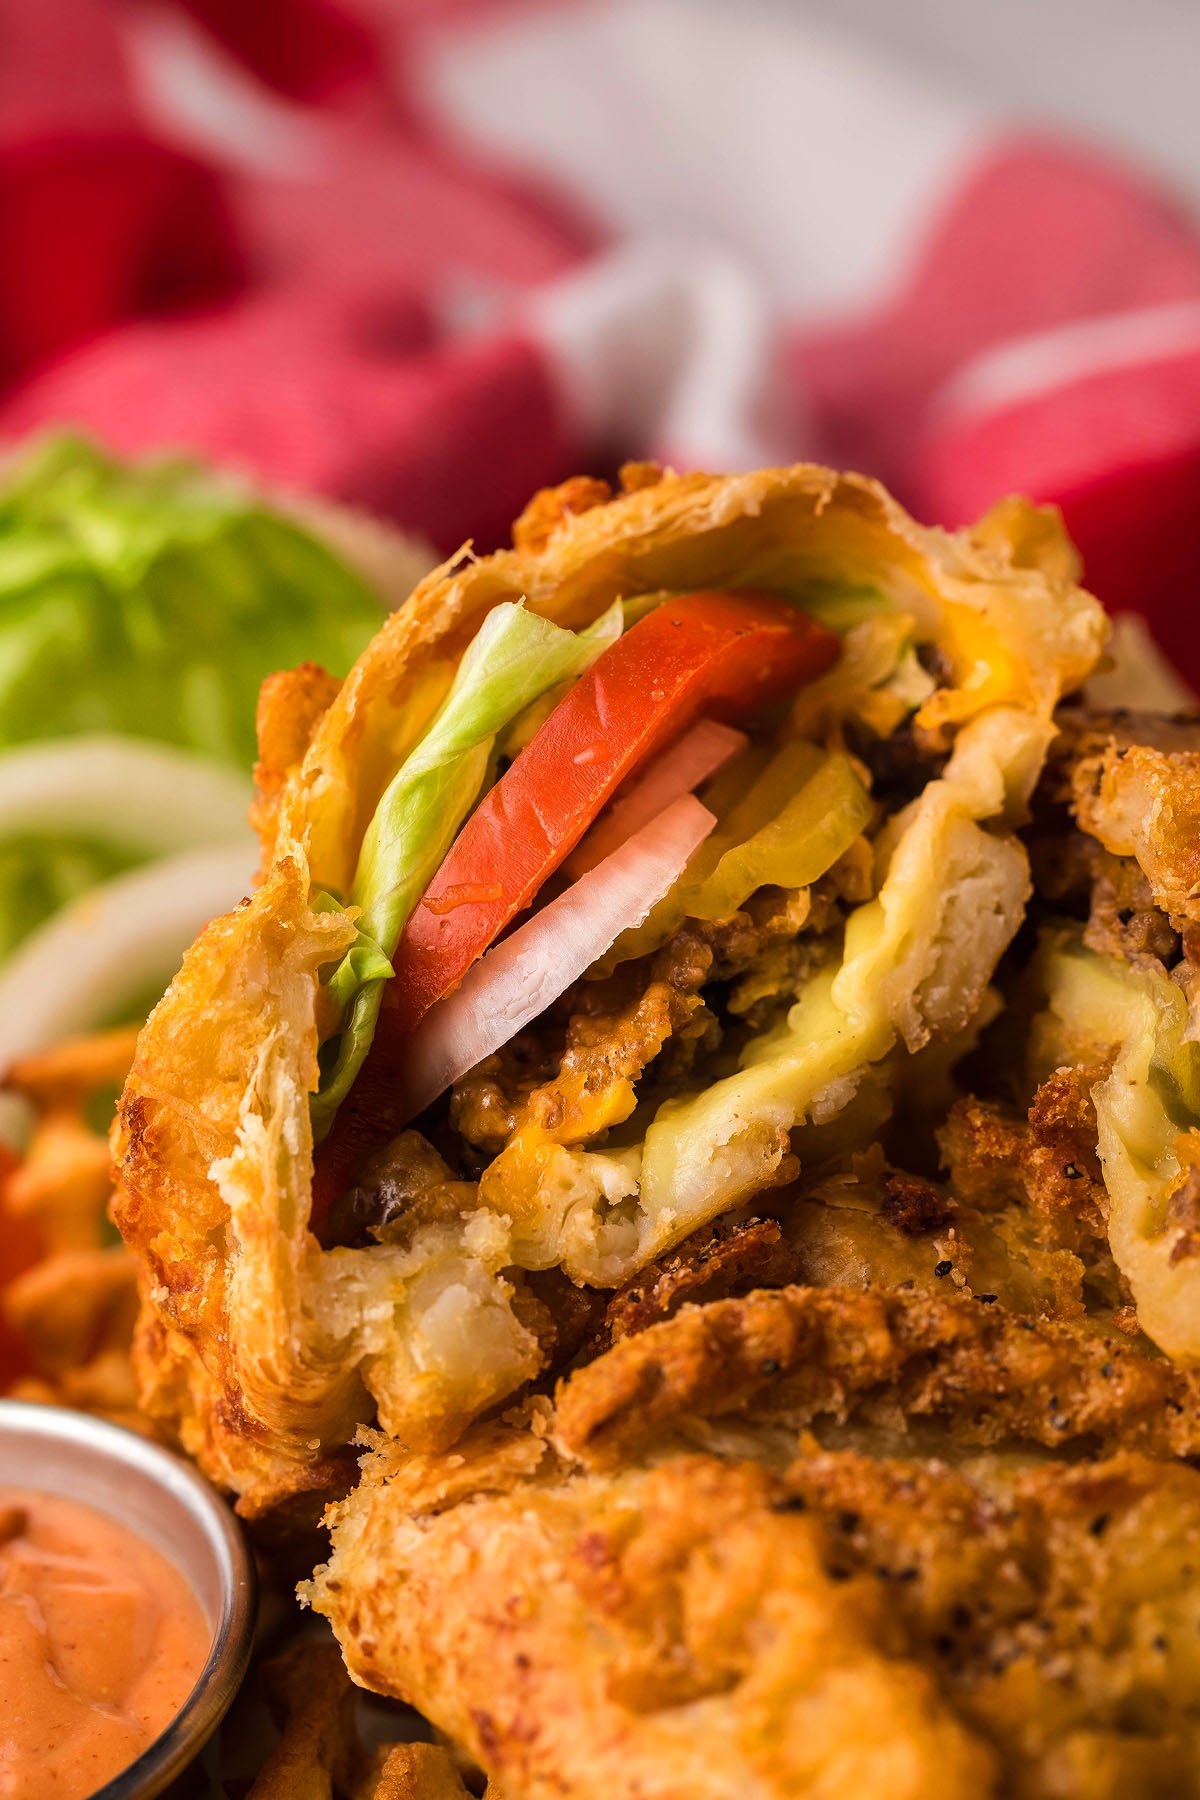
A fun and crave-worthy dish, cheeseburger wellington wraps seasoned beef, cheese, and pickles in pastry, topped with crispy fries and served with a dipping sauce.
You might also enjoy cheeseburger tacos, cheeseburger meatloaf, cheeseburger sliders, and bacon and cheeseburger bowls.

Why You’ll Love It
Creative and fun: Combines your favorite burger and fries into one impressive dish with some of that wellington charm too.
Great texture: Flaky pastry, melty cheese and crispy fries make every bite satisfying.
Perfect for sharing: Ideal for game day, parties or casual family dinners.
Easy to prep ahead: Assemble in advance and bake when ready.
Customizable ingredients: Swap out the cheese or sauce to suit your tastes.

Cheeseburger Wellington Hot Pocket Ingredients
A complete list of ingredients and amounts can be found in the recipe card below.
Puff pastry: Creates a golden, flaky shell that holds in the savory filling wellington-style.
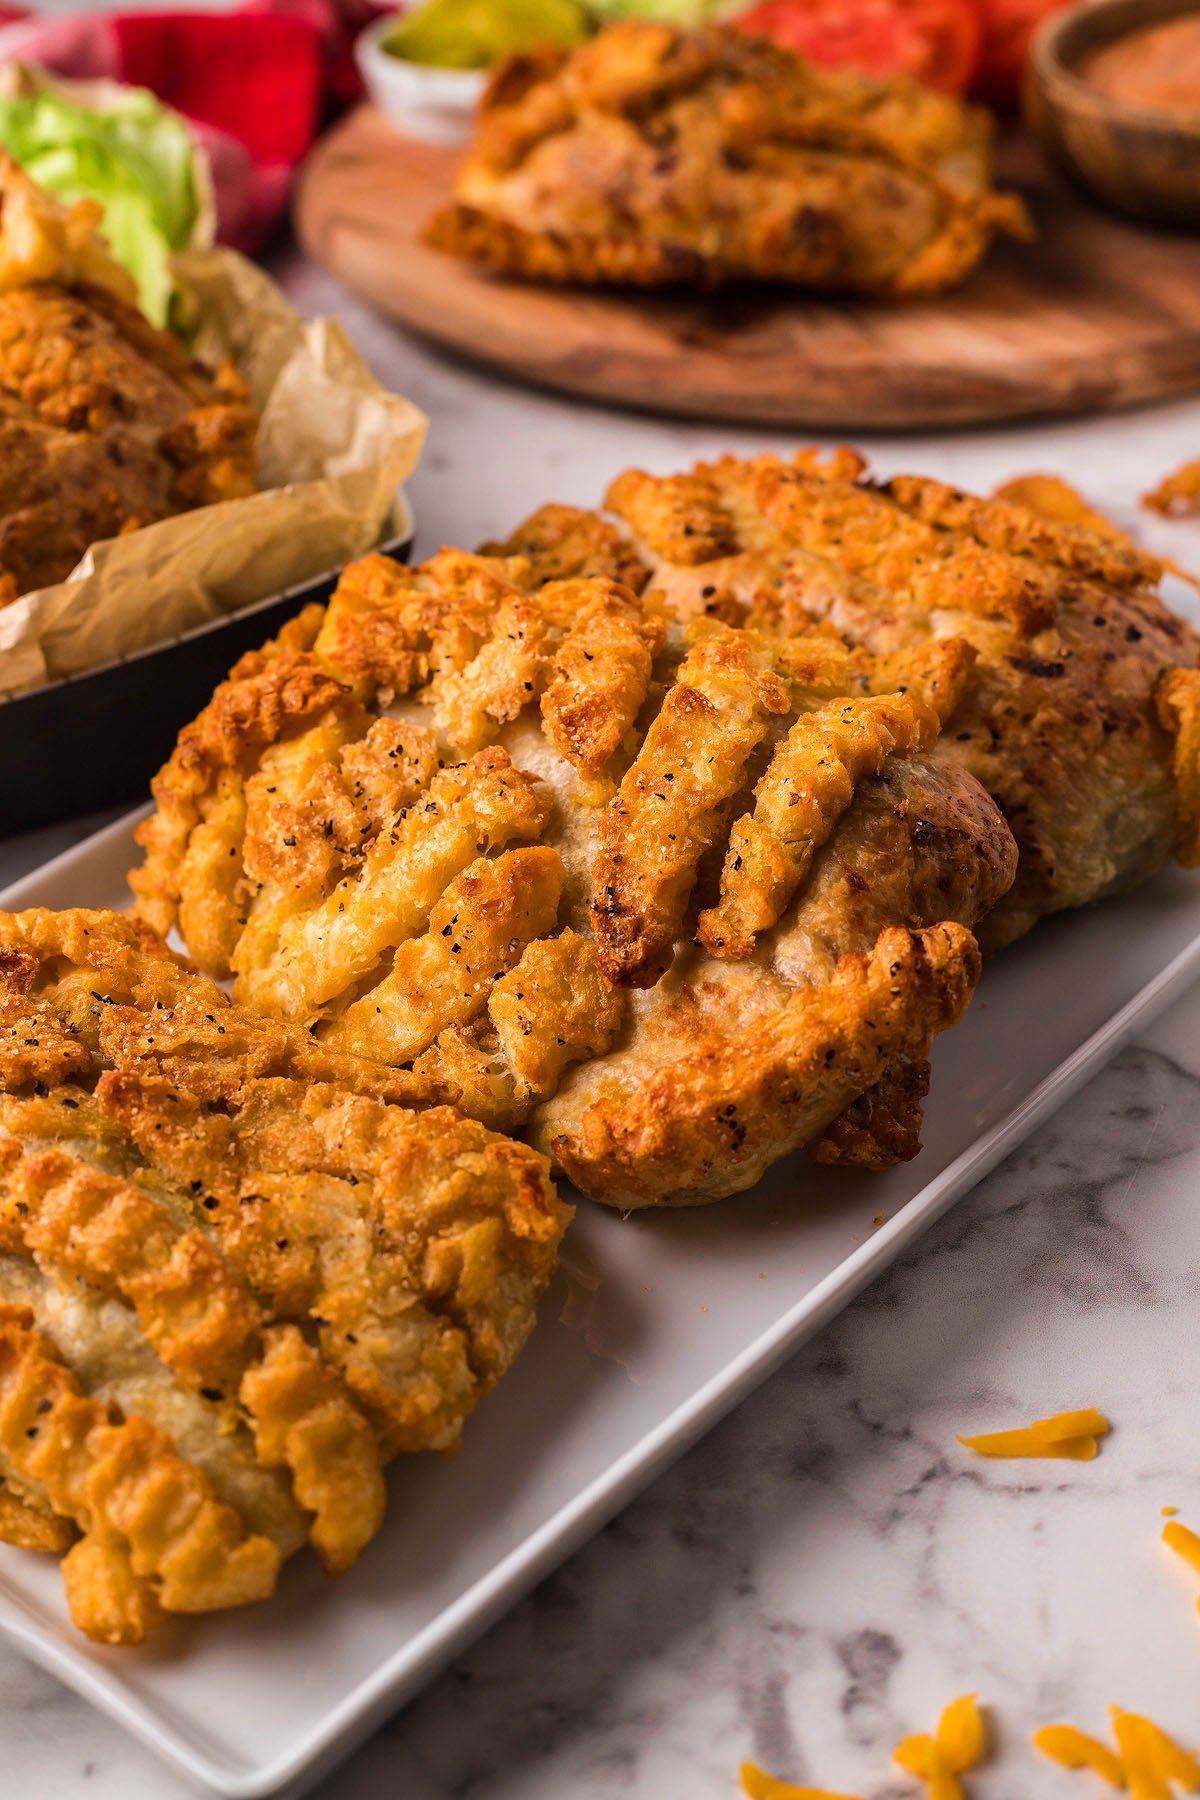
French fries: Pressed into the pastry for crispiness and a fun visual touch.
Ground beef: Seasoned and browned, this forms the heart of the dish.
Steak seasoning: Adds bold flavor to the beef without extra effort.
Pickles: Offer a tangy contrast to the richness of the meat and cheese.
Cheddar cheese: Provides sharp, creamy flavor that melts beautifully.
Mayo, mustard and ketchup: Whisked together for a quick, flavorful dipping sauce.
Egg: Brushed onto the pastry to help it turn golden and crisp.
Garnishes: Onions, tomatoes and lettuce are optional toppings to add a fresh burger-style finish.

How to Make a Wellington Burger
For more detailed instructions with weights and measurements, jump to the printable recipe card.
Make the fry base: Smash thawed fries and season them.
Cook the beef: Brown the ground beef with steak seasoning and drain.
Assemble the pastry: Cut pastry sheets, layer with cheese, beef, and pickles, then fold and seal.
Add fries to pastry: Press the pastries into the smashed fries.
Freeze briefly: Chill the assembled pastries to help fries adhere before baking.
Bake and serve: Bake until golden, then serve right away with the mayo, mustard and ketchup dip.
Substitutions and Variations
Use tater tots instead of fries: Thaw and smash lightly and season for a different texture.
A different protein: Swap the ground beef for ground turkey or ground pork.
Vegetarian version: Use your preferred vegetarian protein in place of the ground meat.
Swap the cheese: Try mozzarella, pepper jack or American cheese for variety.
Add extras: Cooked bacon, jalapeños or caramelized onions make great additions.
Change the dip: Use ranch, BBQ sauce, marinara, or spicy mayo to switch up the flavor.
Serving Suggestions
Side dishes: Mexican style corn, homemade onion rings or smoked potato salad would make a great pairing for cheeseburger wellingtons.
Drinks: Italian cream soda or sparkling strawberry lemonade would be good with your wellington burgers.

How to Store Cheeseburger Wellington
Store: Keep leftovers in an airtight container in the refrigerator and eat within 2 days. They won’t be as crisp as when served fresh.
Freeze: I don’t recommend freezing these after baking, as they’ll thaw out soggy. You could freeze them and then thaw and bake though.
Reheat: Warm it back up in the oven, air fryer or microwave.

Top Tips
Freeze before baking: A short chill helps the fries stick and improves pastry puff.
Seal the edges well: Press firmly to avoid leaks during baking.
Don’t overfill: Use moderate amounts of filling so the pastry closes easily and cooks evenly without leaking or, worse, exploding! Also, I like to poke a few holes in the top of each one before baking so steam can escape during baking.
Thaw your fries: Make sure the fries for the French fry topping are completely thawed before assembling the burger empanada pockets so they don’t leak water into the pies as any remaining ice melts.
Cheeseburger Hot Pocket Wellington FAQs
Yes, but the texture will be less flaky and more dense. Puff pastry gives the best results.
Chilling the assembled pastries before baking and using a wire rack on the baking sheet help the bottoms crisp up properly.
Hot Pocket Cheeseburger Wellington Recipe

Cheeseburger Wellington
Equipment
Ingredients
- 2 Sheets puff pastry
- 1 Bag french fries, 26 Ounces, thawed
- 1 Pound ground beef
- 1 Tablespoon steak seasoning
- 15 pickles, sliced
- 8 Ounces cheddar cheese
- ¼ Cup mayonnaise
- ¼ Cup Dijon mustard
- ½ Cup ketchup
For the Egg Wash
- 1 egg
- 1 Tablespoon water
Optional Garnishes
- onions, sliced
- tomatoes, sliced
- lettuce, iceberg
Instructions
Prepare the Fries
- Lay a sheet of plastic wrap over a baking sheet twice the length of the pan. Arrange the fries in a single layer completely covering the surface, then cover with another sheet of plastic wrap. Do this with both baking sheets.
- Let thaw for 20 minutes.
- Meanwhile, shred the cheddar cheese into a small bowl.
Brown the Beef
- Add ground beef to a frying pan and season with steak seasoning. Brown and drain the ground beef. Set aside.
Assemble the Cheeseburger Wellingtons
- Lightly flour a wooden cutting board and lay out the puff pastry sheets. Cut into 3 equal rectangular sections. Repeat with the second sheet. If using Pepperidge Farms puff pastry sheets, simply cut along the fold.
- Add a layer of cheddar cheese, 3 Tablespoons of ground beef, and sliced pickles to the top half of each puff pastry. Fold the bottom of the pastry over the filling. Press the edges of the pastry together to seal.
- Use a brownie tin or a meat mallet to gently smash the fries. Remove the top sheet of plastic wrap and season the fries with a pinch of salt. Replace plastic wrap on one of the baking sheets.
- Whisk egg and water together for egg wash. Add egg wash to a shallow bowl. Brush each side of the pastry with the egg wash.
- Place the pastries atop the fries on the baking sheet without plastic wrap. Take the sheet with the plastic wrap on top of the fries and place it on top of the pastries. This helps to hold the fries in place. The pastries should be sandwiched between the two baking sheets. Carefully pull the plastic wrap that is between the top fries and the pastries out, while holding the sheets in place.
- Remove the top baking sheet. Gently press fries into the puff pastries. Separate using a knife and firmly press fries into the sides of the pastry.
Chill and Bake
- Place into the freezer for at least 10 minutes, or until ready to bake. This helps the fries to adhere to the sides of the pastry better before baking.
- Preheat the oven to 375 degrees F.
- Line a baking sheet with a wire rack and set the burger hot pockets on top. Bake for 25 minutes.
Make the Dip
- While baking, prepare a dip. Combine mayo, mustard, and ketchup in a small bowl and whisk.
- Serve the cheeseburger wellingtons with the dip and your preferred garnishes.
Notes
Seal the edges well: Press firmly to avoid leaks during baking.
Don’t overfill: Use moderate amounts of filling so the pastry closes easily and cooks evenly without leaking or, worse, exploding! Also, I like to poke a few holes in the top of each one before baking so steam can escape during baking.
Thaw your fries: Make sure the fries for the French fry topping are completely thawed before assembling the burger empanada pockets so they don’t leak water into the pies as any remaining ice melts.
Nutrition


Cheeseburger wellington is the ultimate fusion of comfort food classics, bringing together savory beef, melted cheese, crispy fries, and flaky pastry in one impressive dish. It’s a crowd-pleaser that’s fun to make, easy to serve, and full of familiar flavors with a fresh twist. Whether you serve it for a weekend meal, a casual gathering, or just because, this recipe is sure to get attention and leave everyone asking for seconds.
Other Recipes to Try


Bella Bucchiotti
Bella Bucchiotti is a Canadian-based syndicated food, travel, and lifestyle writer, photographer, and creator at xoxoBella. She founded xoxoBella in 2015, where she shares her love for food, dogs, sustainability, fitness, crafts, outdoor adventures, travel, and philanthropy to encourage others to run the extra mile, try new recipes, visit unfamiliar places, and stand for a cause. Bella creates stress-free and family-friendly recipes for weeknight dinners and festive feasts.


I can’t wait to whip this up again; it was such a hit with everyone!
This was a flavor explosion. Absolutely amazing!
My kids love this so much. I have made it at least thrice this past month!
The ultimate comfort food. My family loves it and they’ve been asking me to make it again.
The best recipe! I am excited to make it again this weekend.
These are so clever and look delicious!