This post may contain affiliate links, please see the privacy policy for details.
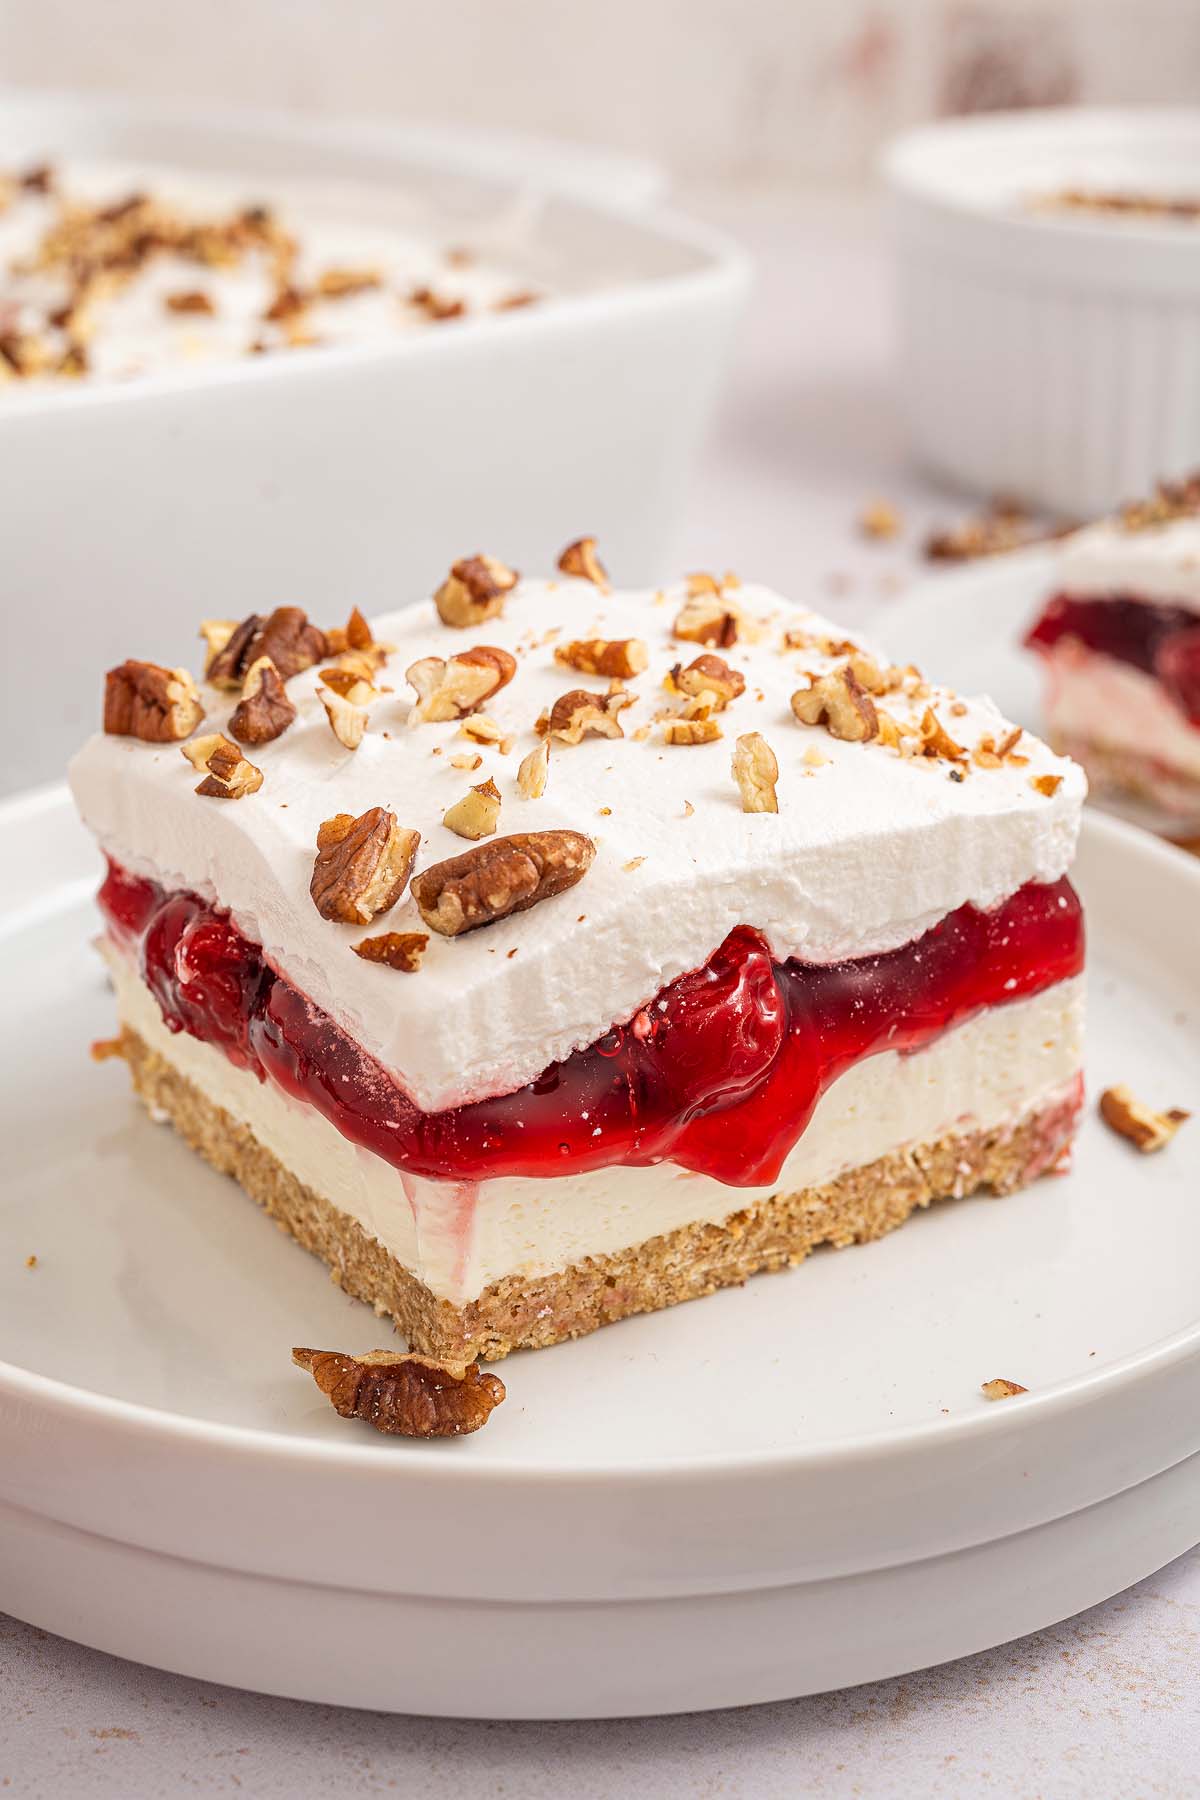
Cherry lush is the no-bake dessert dreams are made of—creamy, fruity, and absolutely irresistible. Imagine a buttery graham cracker crust topped with a cloud of sweetened cream cheese, a generous layer of fluffy whipped topping, and finished with a vibrant, glossy cherry pie filling. Each bite is a perfect balance of rich, tangy, and sweet flavors that practically melts in your mouth. It’s the ultimate make-ahead treat for summer barbecues, holiday feasts, or any time you need a dessert that looks impressive but is secretly a cinch to make.

Why You’ll Love It

This easy no-bake cherry lush dessert features layers of graham cracker crust, creamy cheesecake, cherry pie filling, and a light, fluffy whipped topping with chopped nuts.
No baking required: It’s completely no-bake, making it perfect for warm-weather entertaining when you don’t want the oven on.
Fuss-free elegance: It’s simple to prepare but looks stunning on the table.
Tastes incredible: Everything from the juicy cherry pie filling and fragrant vanilla to the sweet crust and cream cheese layer tastes so good and the contrasting layers add interest. You’ll definitely want a second slice of this!

If you enjoy this, you might also like tangy key lime lush, cherry cheesecake egg rolls, playful key lime pie rum jello shots, or a cherry slab pie.
No Bake Cherry Lush Ingredients
A complete list of ingredients and amounts can be found in the recipe card below.
Unsalted butter: Binds the crust and adds rich, buttery flavor. Softened butter will melt easier in the microwave and won’t pop as much.
Graham crackers: Crushed to form a sweet, slightly crunchy base. I used store-brand honey graham crackers.
Brown sugar: I used light brown sugar. It works with the melted butter to keep the crust intact when it is sliced and adds a hint of caramel sweetness.
Cream cheese: Forms the creamy, tangy filling layer. Room temperature cream cheese is easier and faster to blend, but you want to make sure not to leave it out on the counter for longer than a couple of hours.
Powdered sugar: Sweetens the cream cheese without graininess.
Vanilla extract: Enhances the flavor of the cheesecake layer.
Whipped topping: Adds airy lightness and layers of creaminess. I used a store-brand frozen whipped topping, similar to Cool Whip.
Cherry pie filling: Brings bright color, sweet-tart flavor, and juicy texture.
Pecans or walnuts: This optional topping adds crunch and the nutty flavor complements the cherries.

How to Make Cherry Cheesecake Lush Dessert
For more detailed instructions with weights and measurements, jump to the printable recipe card.
Prepare the crust: Blend graham crackers and brown sugar in a food processor, then drizzle in melted butter and pulse until it looks like wet sand.
Press and chill the crust: Press the mixture into a prepared baking pan or baking dish using the bottom of a glass. Freeze until set.
Make the cream cheese layer: In a medium mixing bowl combine cream cheese, powdered sugar and vanilla extract, mixing until smooth and creamy.
Add whipped topping: Fold in half the thawed Cool Whip and mix on a low speed until fully combined.
Assemble the filling: Add the cream cheese mixture to the chilled crust and spread evenly.
Add the cherry layer: Spoon the cherry filling over the cream cheese layer and spread with a spoon.
Top with whipped topping: Carefully spread the remaining whipped topping with an offset spatula over the cherry layer to avoid mixing the colors.
Chill the dessert: Cover the pan with plastic wrap and refrigerate overnight or for at least 6 hours.
The finishing touches: Sprinkle chopped nuts on top if liked. Serve and enjoy!

Substitutions and Variations
Gluten-free option: If you want a gluten-free version, use gluten-free cookie crumbs instead of graham cracker crumbs.
Graham crackers: Use crushed shortbread cookies or vanilla wafer crumbs instead of graham crackers for a different crust flavor.
Cool Whip: Use homemade whipped cream in place of whipped topping for a richer, less sweet version. You could also make your own real whipped cream.
Cherry pie filling: Swap the canned cherries pie filling for strawberry, peach or blueberry pie filling for a seasonal twist. I love the cherry version but definitely plan to try other flavors for future desserts!
Use pudding mix: You could use vanilla pudding, chocolate pudding or cheesecake pudding mix instead of the cream cheese for that layer. Any flavor of instant pudding mix would work.
Unsalted butter: If you only have salted butter, you can use that.
Sugar: Use light brown sugar or dark brown sugar in the crust.
Nuts: Choose from finely chopped pecans, chopped walnuts, hazelnuts, or almonds for your topping. Chopped mixed nuts are another idea.

Serving Suggestions
Appetizers: Begin your meal with a peach panzanella salad or warm homemade focaccia with olive oil and balsamic vinegar for dipping.
Main dishes: Enjoy a steak sandwich or Cajun chicken and sweet potatoes.
Desserts: Finish off with a slice of this delicious cherry cheesecake lush dessert and perhaps some homemade Italian cream soda.

How to Store
Store: Cover the cherry cheesecake lush with plastic wrap or store it in an airtight container. Eat within 3 days.
Freeze: You can freeze this dessert for up to 2 months. Cover it tightly with both plastic wrap and foil.
Thaw: Defrost overnight in the refrigerator before slicing and serving.

Top Tips
Avoid lumps: Make sure the cream cheese is smooth before adding the whipped topping. You don’t want any lumps in the cheesecake layer.
Keep the speed low: You want to mix in the whipped topping with the mixer at low speed so it doesn’t deflate too much. Alternatively, you can gently fold in the whipped topping with a wooden spoon or silicone spatula.
Chill thoroughly: Give it at least 6 hours in the refrigerator so the layers set properly and slice cleanly.
Spread layers gently: Especially the top whipped layer—go slowly to avoid mixing with the cherry filling.
Add nuts to the crust: Adding pecans or walnuts to the graham cracker crust will add even more of a nutty flavor to the dessert.

No Bake Cherry Lush Dessert FAQs
Yes! It’s best made the day before so the layers have time to set.
Use a sharp knife and wipe it clean between cuts for neat squares.

Best Cherry Lush Recipe

Cherry Lush
Equipment
- Baking Dish 9 x 13-Inch
Ingredients
- ½ Cup butter, unsalted, plus more for greasing
- 12 graham crackers
- 2 Tablespoons brown sugar
- 16 Ounces cream cheese, at room temperature
- ¾ Cup powdered sugar
- 1 Teaspoon vanilla extract
- 16 Ounces whipped topping, thawed
- 2 Cans cherry pie filling, 21-Ounce cans
Optional Topping:
- ¼ Cup pecans, or walnuts, chopped
Instructions
- Melt the butter in a small, microwave-safe bowl in 30-second intervals in the microwave. Set it aside.
- Grease a 9 x 13-inch baking dish or pan with butter or shortening.
- Place the graham crackers and brown sugar into a food processor and pulse until the crackers are chopped into fine crumbs. Slowly add the melted butter while the processor runs at low speed until the crumbs resemble wet sand.
- Pour the crumbs into the greased baking dish, and use the flat bottom of a glass or measuring cup to firmly press the crumbs into the base of the dish. Place the crust in the freezer for 15 to 20 minutes or until firm.
- While the crust is freezing, add the cream cheese, powdered sugar, and vanilla extract to a large bowl and beat with an electric mixer until smooth.
- Add half the whipped topping to the cream cheese mixture, and beat at low speed until everything is combined thoroughly.
- Spoon the cheesecake layer over the firm crust, and spread it out evenly. Then, pour both cans of the cherry pie filling on top, and spread it out with a spoon. Finally, top off the dessert with the remaining whipped topping, and smooth it out carefully so the cherry pie filling doesn’t get mixed into it.
- Cover the dessert with plastic wrap and chill in the refrigerator for at least 6 hours, but overnight is best.
- Top with chopped pecans or walnuts, if desired, and serve chilled.
Notes
Keep the speed low: You want to mix in the whipped topping with the mixer at low speed so it doesn’t deflate too much. Alternatively, you can gently fold in the whipped topping with a wooden spoon or silicone spatula.
Chill thoroughly: Give it at least 6 hours in the refrigerator so the layers set properly and slice cleanly.
Spread layers gently: Especially the top whipped layer—go slowly to avoid mixing with the cherry filling.
Add nuts to the crust: Adding pecans or walnuts to the graham cracker crust will add even more of a nutty flavor to the dessert.
Nutrition


Cherry lush pairs a crumbly graham cracker crust with smooth layers of cheesecake and whipped topping and a layer of cherry pie filling in between that’s filled with tender cherries. Adding chopped pecans on top adds a crunchy element to this cherry pecan cheesecake lush dessert which is perfect for pretty much any occasion. It’s so sweet and a real crowd-pleaser. And, if you love cherries, you won’t want to miss out on this dessert!
Other Recipes to Try


Bella Bucchiotti
Bella Bucchiotti is a Canadian-based syndicated food, travel, and lifestyle writer, photographer, and creator at xoxoBella. She founded xoxoBella in 2015, where she shares her love for food, dogs, sustainability, fitness, crafts, outdoor adventures, travel, and philanthropy to encourage others to run the extra mile, try new recipes, visit unfamiliar places, and stand for a cause. Bella creates stress-free and family-friendly recipes for weeknight dinners and festive feasts.


I FIND TWO CANS OF CHERRY PIE FILLING ARE TOO MUCH,, ONE CAN IS SUFFICIENT.
I hope you enjoyed it!
Creamy, fruity, and that graham cracker crust just ties it all together. This cherry lush is dangerously good!
This dessert was light, creamy, and absolutely dreamy! The cherry topping was so pretty and the layers just melted in my mouth. It looked fancy but was super simple to make.