This post may contain affiliate links, please see the privacy policy for details.


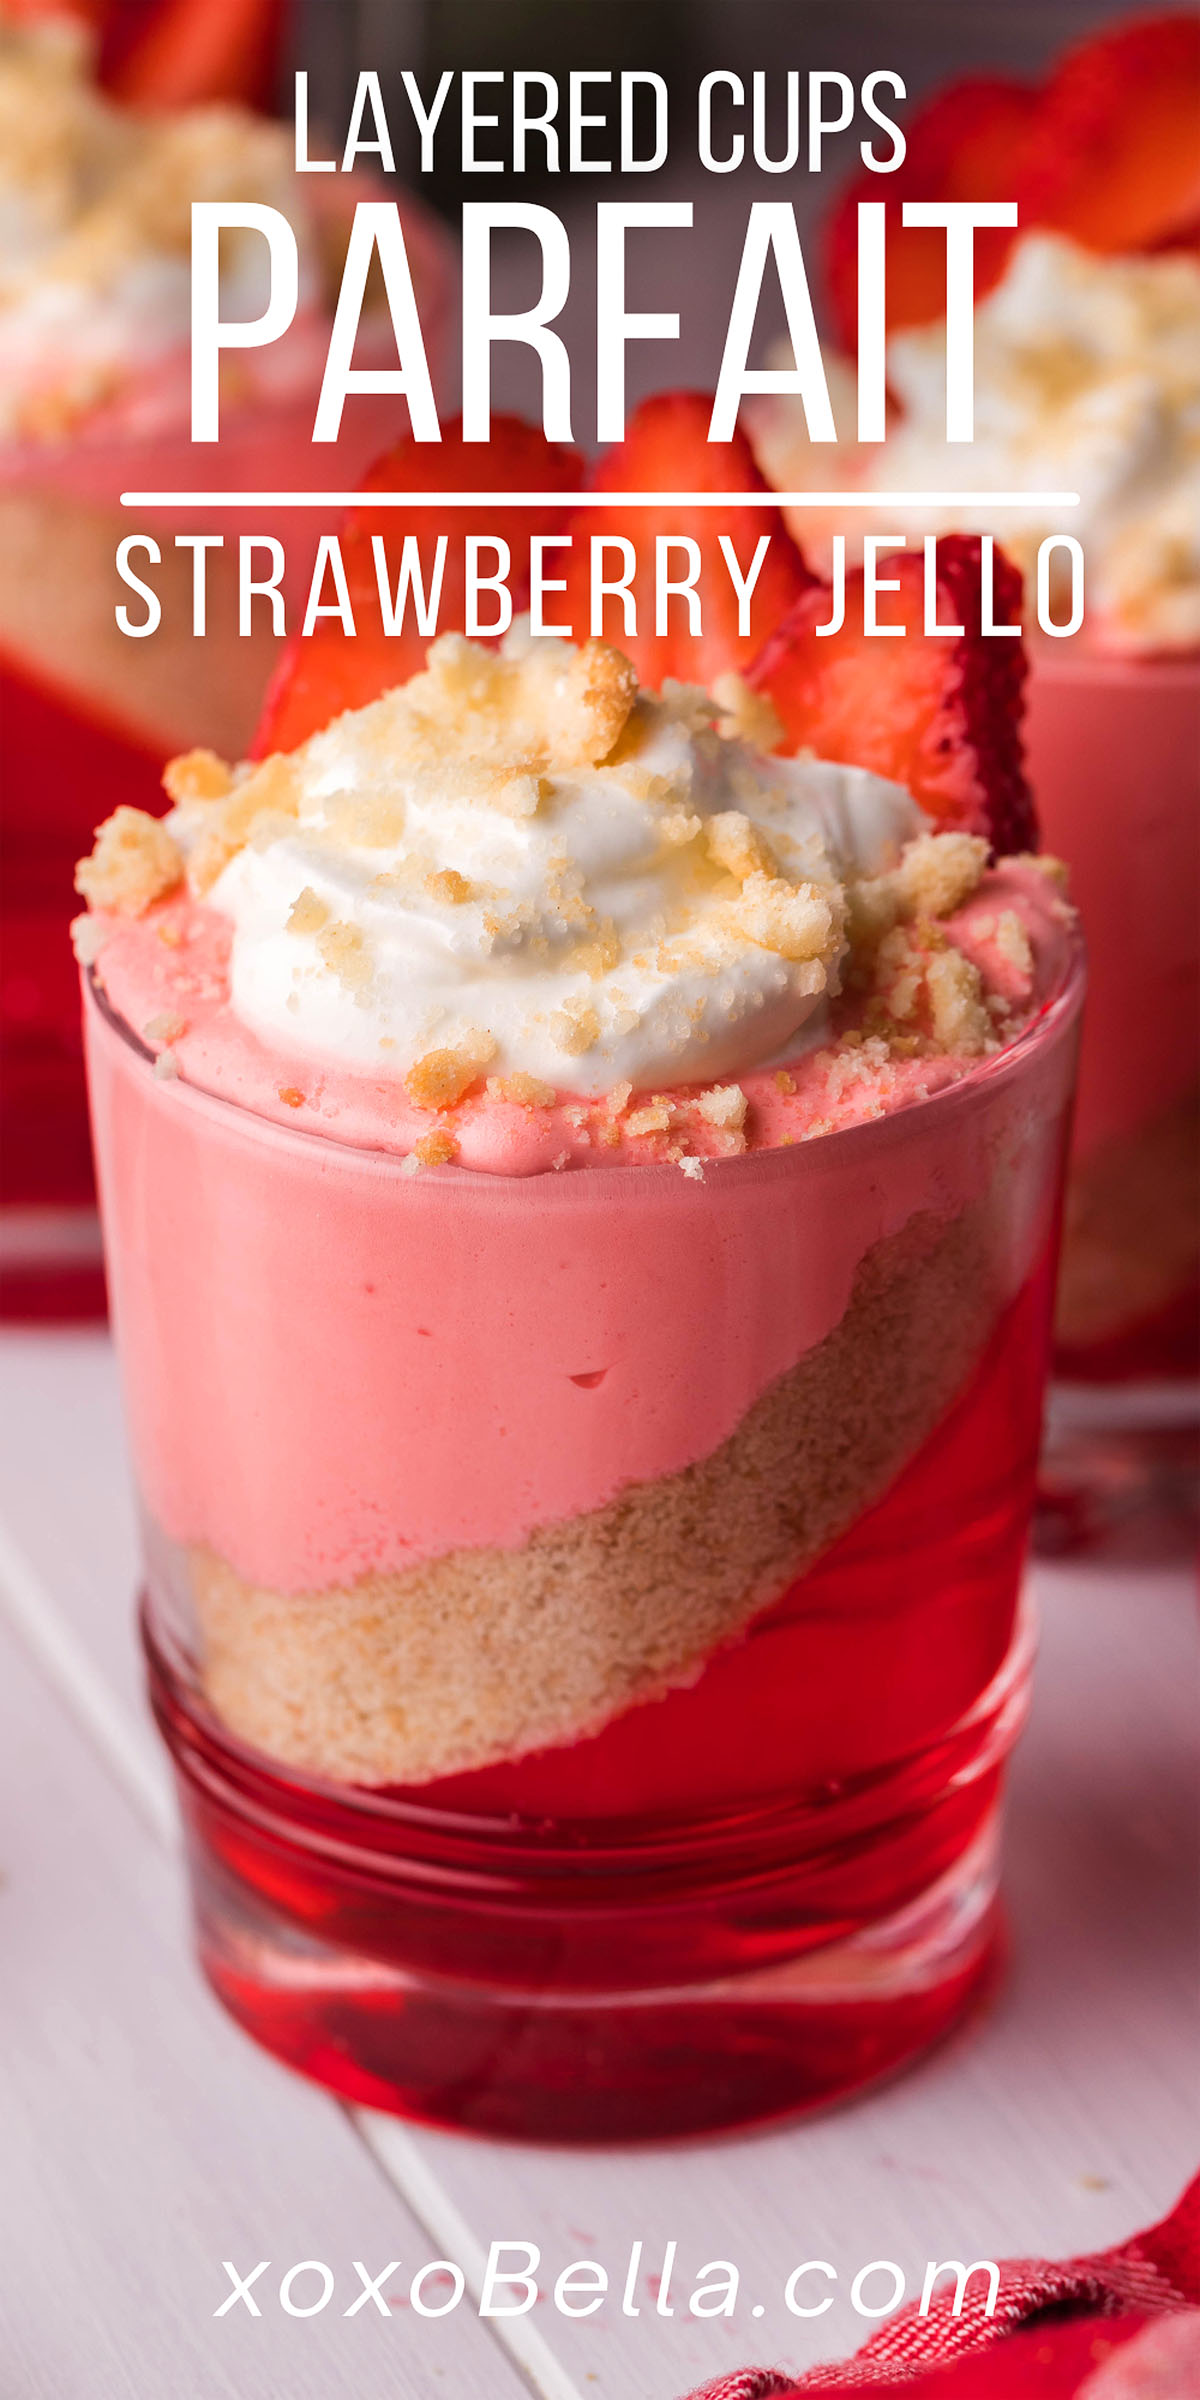
Layered strawberry jello cups are a fun, fruity treat that’s as pretty as it is tasty. With a mix of vibrant jello, whipped layers, cookie crumbles, and creamy topping, this no-bake dessert is guaranteed to impress. Whether you’re making them for a party, picnic or just to brighten up your week, these layered cups are easy to put together and customize. Chill time does most of the work here, giving you a showstopping sweet with minimal effort in the kitchen.

Layered strawberry jello cups feature classic jello, whipped topping, cookie crumbles, and a creamy topping, creating a sweet layered dessert you’ll love.
You might enjoy these berry recipes and maybe also a berry cheesecake tart, strawberry jello pie and easy banana split.

Why You’ll Love It
Easy to make: Simple steps and store-bought ingredients keep this low-effort.
Visually impressive: That angled layer looks fancy, but it’s easy to pull off.
No baking required: Perfect for summer or when you don’t want to turn on the oven.
Customizable: Use different jello flavors or cookies to mix it up.
Make-ahead friendly: Prep the night before and chill until serving.

Layered Strawberry Jello Cups Ingredients
A complete list of ingredients and amounts can be found in the recipe card below.
Strawberry jello: The base of the dessert, giving it bright color and fruity flavor.
Cool Whip: Adds a fluffy texture and creaminess to the layers.
Marshmallow fluff: Brings sweetness and smooth texture to the topping.
Sour cream: Balances the sweetness and adds richness.
Shortbread cookies: Crushed for a buttery cookie layer with great texture.
Strawberries: Fresh garnish for a pop of color and extra berry flavor.

How to Make No Bake Jello Cups
For more detailed instructions with weights and measurements, jump to the printable recipe card.
Prepare the jello: Boil water and prepare the strawberry jello according to package instructions. Let it cool to room temperature.
Chill the glasses: Place serving glasses in the fridge while the Jello cools.
Set the angle: Remove glasses from the fridge and rest them at a 45-degree angle in a loaf pan, taco tray, or use foil for stability.
Layer the first part of jello: Pour plain cooled jello into the angled glasses until it just reaches the rim. Chill until set.
Make the creamy jello layer: Whisk together 1 cup of Jello with 1 cup of Cool Whip. Refrigerate this mixture for 2 hours. If it separates, whisk again and chill another 10 minutes.
Add cookie layer: Pulse shortbread cookies into crumbs. Once the first jello layer is set, add a spoonful of crumbs on top and gently press down.
Add creamy Jello: Spoon the jello and Cool Whip mixture over the crumb layer. Use a spatula to smooth the top. Stand glasses upright and refrigerate for at least 2 more hours or overnight.
Make the topping: Whisk together the remaining Cool Whip, marshmallow fluff and sour cream until smooth. Add a dollop to each glass about an hour before serving.
Garnish and serve: Top with sliced strawberries and a sprinkle of reserved cookie crumbs.

Substitutions and Variations
Swap the fruit: Try raspberries or peaches in place of strawberries.
Use different cookies: Graham crackers or vanilla wafers work well too.
Make it boozy: Add a splash of strawberry liqueur to the jello for an adult twist.

Serving Suggestions
For dessert: Enjoy a jello cup after any kind of main dish from crispy ginger beef and hibachi noodles to a Caprese pizza.
As a sweet treat: Serve it with a gingerbread latte cocktail or homemade lemonade.

How to Store Layered Jello Cups
Store: Cover the jello cups and store in the refrigerator for up to a week. Don’t add the toppings until it’s time to serve.
Freeze: You can freeze jello but it changes the texture, with tiny ice crystals adding a crunchy, airy texture. If you want to try freezing them, don’t add any of the toppings until ready to serve.
Thaw: Defrost in the refrigerator overnight.

Top Tips
Chill glasses first: Helps the jello set evenly and hold the angled shape.
Don’t rush the layers: Let each part fully set before adding the next.
Use a piping bag: Makes it easier to add the fluffy layer without disturbing the base.

Strawberry Jello Cups FAQs
When you’re making any recipe using jello or gelatin, including this jello, cool whip and marshmallow fluff dessert, you’re going to have to allow time for it to set. It can take hours to set so you might like to start this recipe in the morning if you’re serving it after dinner. Another idea is to make it a day ahead. But if you do this, don’t add the cookie crumbs until just before serving else they’ll go a bit soggy. Also don’t add the sliced berries until serving else they might dry out a little.
Yes, you can add a splash to each layered parfait. Consider a little DeKuyper strawberry schnapps liqueur in the plain jello layer to jazz them up a little. It goes without saying that would make this no-bake dessert strictly for the grownups only!
Let each layer chill fully before adding the next, and spoon or pipe gently to avoid disturbing the set jello.

Layered Strawberry Jello Parfait Cup Recipe

Layered Strawberry Jello Cups
Equipment
- Pastry Bag Optional
Ingredients
- 1 Package jello, 6-Ounce, strawberry
- 2 Cups Cool Whip
- 1 Cup marshmallow fluff
- ½ Cup sour cream
- 10 shortbread cookies,
- 4 strawberries, sliced, for garnish
Instructions
- Prepare jello according to package instructions. As the water is boiling, chill desired serving glasses in the fridge.
- Allow jello to cool to room temperature.
- Remove glasses from the fridge. Place glasses so they are resting inside or atop something sturdy at a slight angle (45 degrees). For our stemmed cocktail glasses, we found using a loaf pan worked perfectly. The whiskey glasses rested at the perfect angle along taco trays. You can also create this same angle using foil if all else fails! Use any glassware you want. I used a mix of cocktail glasses and whiskey glasses. This recipe makes 8 ½ cups of jello, and depending on the size of your glassware each glass will hold between 1 and 2 cups of jello.
- Remove 1 cup of jello and pour into a glass bowl. Add in 1 cup of Cool Whip and whisk. Refrigerate for 2 hours. (If separation occurs, whisk well and let set for at least 10 minutes after stirring).
- Meanwhile, very carefully pour the jello into the glasses until it reaches the rim of the glass. Place into the fridge until the jello is set, about 2 hours.
- After 2 hours the jello should be set enough to move on to layering. Be gentle as it's still at a fragile stage. Keep the glasses at an angle. Add shortbread cookies to a food processor (or Ziploc bag). Once they reach crumb-like texture, scoop 2 or 3 spoonfuls into each glass over the top of the jello. Gently press down on the crumbs to even the layer. Add more for a thicker layer if desired. Save some for sprinkling on top at the end.
- Next, scoop the with Cool Whip into the glass over the crumbs. It will have a fluffy, slightly dense but pliable texture. Use a spatula to smooth. At this point, you can stand the glasses up straight as the parfait fully sets. Chill for at least 2 full hours, but I recommend overnight.
- When 1 hour remains on chilling time (or 1 hour prior to serving) prepare the topping. Combine Cool Whip, marshmallow fluff and sour cream in a bowl and whisk well until smooth. Add a dollop onto the top of each parfait.
- When ready to serve, add sliced strawberries and shortbread crumbs on top of the parfait.
Notes
Don’t rush the layers: Let each part fully set before adding the next.
Use a piping bag: Makes it easier to add the fluffy layer without disturbing the base.
Nutrition


These jello cups aren’t just tasty. They’re also beautiful to look at and a total crowd-pleaser. The contrast of the fruity base, buttery cookie layer, creamy whipped topping, and fresh strawberry garnish makes every spoonful fun and flavorful. Whether you serve them in cocktail glasses, tumblers or mason jars, these are sure to be a hit at your next event or a sweet surprise on a regular day.
Other Recipes to Try

Bella Bucchiotti
Bella Bucchiotti is a Canadian-based syndicated food, travel, and lifestyle writer, photographer, and creator at xoxoBella. She founded xoxoBella in 2015, where she shares her love for food, dogs, sustainability, fitness, crafts, outdoor adventures, travel, and philanthropy to encourage others to run the extra mile, try new recipes, visit unfamiliar places, and stand for a cause. Bella creates stress-free and family-friendly recipes for weeknight dinners and festive feasts.


These were so fun to make and even more fun to eat! The layers turned out beautifully, and they were such a refreshing treat after dinner.