This post may contain affiliate links, please see the privacy policy for details.
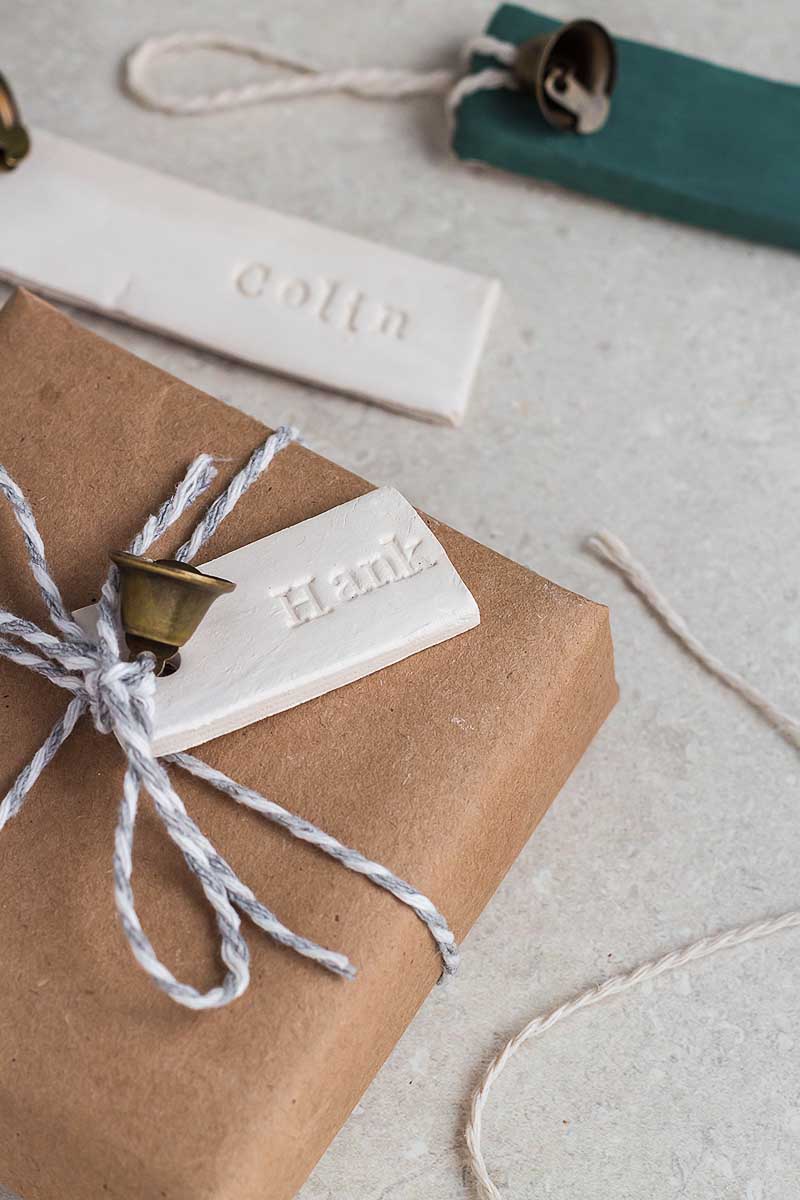
There’s always a lot to plan and think about in the run-up to Christmas – what you’re going to cook, how you’re going to decorate the house, what gifts you’re going to buy, and more. Christmas is also the perfect time for crafting and these clay name ornaments are fun and easy to make. So, plan the festivities early and make sure you set aside some time for Christmas crafting! You’re going to love how these air dry clay Christmas ornaments come out.

DIY personalized ornaments are fun to make and just look how cute these are. You don’t need many materials to make them and they’re ideal for gifting too.
Also consider birdseed ornaments, pom pom bookmarks or citrus shower steamers. These bath bombs are fun too, or try this succulent table centerpiece.

Why You’ll Love Them
Easy: There’s nothing tricky about making air dry clay Christmas tree ornaments and you might want to make this a family activity. The kids will love making DIY stamped clay ornaments too and can choose their own cookie cutter shape.
Customizable: You can add any flourishes and decorations you want to these, such as paint, glitter, ribbons, a cinnamon stick, faux berries, or anything else you want on your air dry clay ornaments.
Cute: A regular gift tag will work on a Christmas gift, but why not make your gifts extra special this year with these gorgeous air dry clay decorations? Everybody will love the special touch!

Materials Needed for Clay Gift Tag Ornaments
To make these gorgeous DIY clay Christmas gift tags that double as ornaments, you’re going to need air dry clay (here), a butter knife, alphabet stamps (here), cotton twine (here), little brass bells (here), clear tacky glue (here) and (optionally) some acrylic paints.


How to Make Air Dry Clay Christmas Tree Decorations
For more detailed instructions, jump to the printable instructions card.
Cut out the clay shapes: Roll out the air dry clay with a rolling pin to about 1/4-inch thickness and use butter knife to cut rectangles (or whatever shape you like) in your preferred size.
Smooth any rough edges: Wet a fingertip and smooth out any rough parts or bumps and then let the water dry on the clay surface for 20 minutes or so.
Add the names: Use alphabet stamps (here) to stamp a name into each air dry clay ornament.
Let them dry completely: Poke a hole through the ornament on the opposite side of where you put the name and then let the Christmas ornaments dry for about 24 hours on newspaper or wax paper.
Decorate the Christmas ornaments: Paint each ornament shape with acrylic paint if you like, or leave plain if not, and then thread a little bell on an 8-inch piece of cotton twine and pull it through the hole you made, gluing it in place.
The finishing touches: Add some ribbon so you can tie these dry clay Christmas ornaments on to gifts or hang them on the Christmas tree.

Substitutions and Variations
Use white air dry clay if you can find it, or another color if not. If you’re planning to paint them, it doesn’t matter much which color you have. I like this brand of air dry clay.

When you’re threading the little bells on to the ornament you can also add other things like ribbon, little wooden beads painted red like berries, greenery, a cinnamon stick, or anything else you want. You’re going to have so much fun deciding how to decorate yours.

How to Use Air Dry Clay Ornaments
These were created with gift tags in mind, since they make a cute replacement for traditional paper gift tags, but you could hang them on the Christmas tree or make them to be given as gifts.

If you want to try making your own Christmas garlands too, you might like orange Christmas garlands or this one with felt Christmas trees. Another idea is making your own Christmas cookie boxes.

How to Store Air Dry Clay Decorations
Store: Stash these away safely so you can reuse them the following year. I like to put a little bubble wrap around each one then keep them in a box with other salt dough ornaments and the other Christmas decorations.

Air Dry Clay Name Tag FAQs
You can use a knife or even a pizza wheel to cut out the clay tags. As they’re homemade ornaments, you shouldn’t be too concerned with making perfect rectangles. A little rustic tends to be even cuter. You might even want to use cookie cutters if you want to make different shapes, such as leaves, Christmas trees or anything else with a festive theme.
Excess clay will just dry out so it’s best to use all the clay at once. You can work on more Christmas crafts or double up on names in case one gets broken or you’re giving someone more than one gift, or make a different Christmas ornament with the remaining clay.


Air Dry Clay Ornament Instructions

Clay Name Ornaments/Gift Tags
Supplies
- Air dry clay
- Butter knife
- Alphabet stamps
- Acrylic paint, optional
- Cotton twine
- Small brass bells
- Clear tacky glue
Instructions
- Roll out a handful of the air dry clay ¼” thick.
- Use a butter knife to cut rectangular shapes into the clay (you can do small or large rectangles depending on what kind of ornament you want.)
- Using a small amount of water on your finger, smooth out any imperfections in the clay. This is also the time to make any changes in the shape of the ornament before it begins the drying process.
- Wait about 20 minutes for the water to dry on the surface of the clay.
- Towards one side of the rectangle, use the alphabet stamps to gently stamp a name into the clay.
- Poke a hole with a straw on the opposite end of the rectangle. This will be to secure the twine when it is dry.
- Let the ornament dry for 24 hours, or until the clay has hardened and turned white.
- You can leave the ornament white, or paint it with any color acrylic paint to add color.
- Cut an 8” piece of cotton twine. Slide the bell onto the twine, then pull the tied twine through the hole in the ornament. Pull the twine through itself to secure it to the ornament, and make sure the knot ends up touching the clay on the back side. Glue the knot in the twine to the back of the ornament to hold the twine in place and hide the knot when it is hanging.
- To use this ornament as a gift tag, use a few inches of ribbon or cotton twine to tie the tag onto your gift bag handles or a gift box.


It’s simpler than you might have expected to make your own clay ornaments, and these are so cute as well as fun to make. Air dry clay is easy to use and you can come up with your own ideas for decorating these to make your own ornaments personalized and unique.
You Might Also Like


Bella Bucchiotti
Bella Bucchiotti is a Canadian-based syndicated food, travel, and lifestyle writer, photographer, and creator at xoxoBella. She founded xoxoBella in 2015, where she shares her love for food, dogs, sustainability, fitness, crafts, outdoor adventures, travel, and philanthropy to encourage others to run the extra mile, try new recipes, visit unfamiliar places, and stand for a cause. Bella creates stress-free and family-friendly recipes for weeknight dinners and festive feasts.


